
The 30-second answer
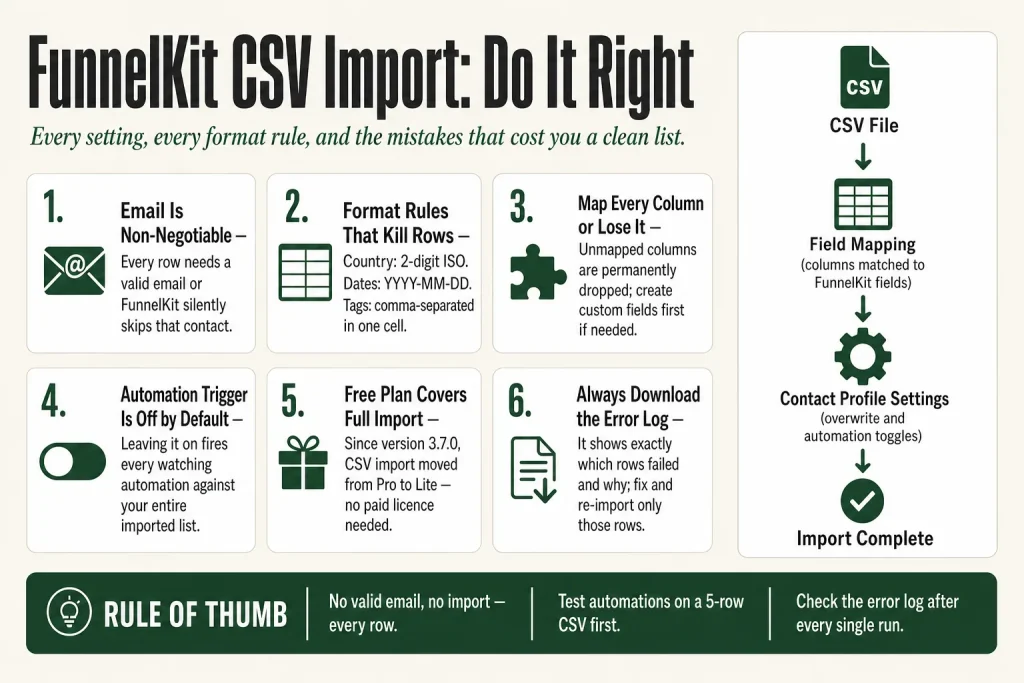
- Email is mandatory. Every row in your CSV needs a valid email address or FunnelKit will skip that contact.
- Format edge cases matter. Country fields must be 2-digit ISO codes (US, GB). Date fields must be YYYY-MM-DD.
- Tags in one cell: comma-separate them. “vip,buyer,2024” becomes three tags on the contact record.
- Map every column before you submit. Unmapped columns are silently dropped. Create a custom field first if no built-in field fits.
- Decide your overwrite rules upfront. “Do Not Overwrite Empty Fields” and “Allow Field Information to be Overwritten” behave differently and cannot be changed mid-import.
- “Trigger Automations for Tag & List Changes” is off by default. When it is off, importing a contact fires zero automations, even if the import assigns a tag or adds them to a list that an automation is watching. Turn it on only when you have confirmed opt-in contacts and a tested automation already waiting on the tag or list you are assigning. Test on a 5-row CSV first. The risk is real: one oversight and your entire imported list enters whatever sequence is watching that tag.
- Download the error log after every run. It tells you exactly which rows failed and why.
- CSV import is available on the free Lite plan. As of version 3.7.0, all contact import tools, including CSV, were moved from Pro to Lite. You do not need a paid licence to run a CSV import. Advanced automation features (smart segmentation, bulk contact actions, contact journeys, broadcasts) remain Pro-only.
Take this fix into your next scenario. The free Builder’s Companion Kit collects the checklists and templates that pair with this guide — so next time, you start from a template, not a blank page. Grab it free →
- What Your CSV Needs Before You Upload
- funnelkit import contacts: The Complete Step-by-Step Walkthrough
- The Contact Profile Settings Explained
- What to Do When a Column Has No Matching Field
- How to Audit Past Imports
- When You Do Want to Fire Automations on Import
- Do You Need a Paid Plan to Import from CSV?
- Worked Example: Migrating from Mailchimp to FunnelKit
- FAQ
A funnelkit import contacts job looks simple until something goes wrong: half your list is missing, fields landed in the wrong columns, or an automation fires on 4,000 people the moment you hit the button. This guide walks you through every step, every setting, and the mistakes that cost you a clean list.
What Your CSV Needs Before You Upload
Think of your CSV like a shipping manifest. The warehouse (FunnelKit) will accept the shipment only if the manifest matches exactly what it expects. Get the format wrong and rows get rejected silently.
The official documentation lists three hard requirements:
- Email is mandatory. The email field must be present in every row, and each address must be in a valid email format.
- Country codes must be two-digit ISO. If the country field is present, it must be in 2-digit ISO code format (US, GB, AU, and so on). Full country names will not map correctly.
- Dates must be YYYY-MM-DD. If a date field is present, it must be in YYYY-MM-DD format.
A few more things to check before you save the file:
- Use a header row. The importer uses column headers to suggest field mappings. Generic headers like “col1” force you to map everything by hand.
- Put tags in a single column, comma-separated. Tags should be separated by commas within the cell, not spread across multiple columns.
- Save as plain CSV (UTF-8), not XLSX. Excel’s default format will not upload.
If you are exporting from Mailchimp, ActiveCampaign, Kit, or another CRM: export their native CSV first, then clean it in a spreadsheet to match the rules above before importing into FunnelKit.
funnelkit import contacts: The Complete Step-by-Step Walkthrough
Here is the full flow from opening the UI to confirming the import completed.
-
Open the Contacts section. Navigate to FunnelKit Automations, then Contacts. Click the “Import” button and hit “Create New.”
-
Select CSV as the source. Select CSV as the source from the options shown. Other options (WordPress, WooCommerce, Mailchimp, ActiveCampaign, Kit) are for direct-connection imports that do not need a file.
-
Upload your file. You can upload the CSV file you exported from another CRM or a file on your computer. Drag and drop the CSV file or browse to upload it, then hit Import.
-
Map the columns. Mapping allows you to store your fields in FunnelKit Automations correctly. You can map the columns of your CSV to the fields in FunnelKit Automations. The importer shows your CSV header on the left and a dropdown of FunnelKit fields on the right. Work through every row. Any column you leave unmapped is dropped permanently from that import run.
If a column in your CSV has no matching built-in field, do not skip it. If you do not find a relevant field in FunnelKit Automations, create a custom field to map the data. Go to Contacts, then Fields, create the field, then come back and map it. See the custom fields section below for details.
-
Configure the Contact Profile settings. Under the Mapping section, there is another section called Contact Profile. This is where you set the options that control how the import treats existing contacts:
- Update Contact Status if Changed: Enable to update the contact’s status when a different status is found during import.
- Do Not Overwrite Empty Fields: Enable to prevent empty values in the import file from overwriting existing contact data.
- Allow Field Information to be Overwritten: Enable overwriting existing contact fields with new values from the import.
- Trigger Automations for Tag & List Changes: Enable to trigger automations when tags or lists are added or updated during import. This is off by default. When it is off, no automation fires during the import run, even if a tag or list assignment would normally trigger one. Enable it only when you have confirmed opt-in contacts and a tested automation waiting on that tag or list. See the full explanation below.
- Skip Existing Contacts (added in version 3.8.0): Enable to leave any contact already in your CRM completely untouched. Only new contacts are created. Use this when you are importing a fresh batch and do not want the run to touch any records already on file.
Read those carefully before you click Import. They are not reversible mid-run. The “Trigger Automations” option in particular is the one that sends a welcome sequence to your entire list if you leave it on by mistake. If you are not certain your automations are configured correctly, test on a 5-row CSV first and check the logs before running the full list.
-
Hit Import and wait. A progress bar shows how many contacts were skipped, failed, or successfully imported. Processing time depends on list size and your server’s available resources, so a larger file or a resource-constrained server will take longer. Go to Contacts to see your imported contacts once the import is complete.
-
Download the error log. You can either “Go To Contacts” to see recently added contacts or click “Download Error Log” for the contacts that failed to import. The error log downloads to your system in .csv format. Open it, fix the offending rows, and re-run only those contacts.
The Contact Profile Settings Explained
These settings trip up most operators on their first import. Here is what each one actually does in plain terms.
“Do Not Overwrite Empty Fields” is your safety net when merging a partial list into existing records. If your CSV has a blank phone column but your existing contact record has a phone number stored, turning this on keeps the stored number intact. Leave it off and the blank cell wipes the stored value.
“Allow Field Information to be Overwritten” does the opposite job: it lets the import update fields that already have data. Use this when you are intentionally refreshing contact data, like re-importing after a data cleanup.
“Update Contact Status if Changed” moves a contact between statuses (lead, customer, subscriber) if the imported row contains a different status. Useful when you are syncing a list that has status columns from another CRM.
“Skip Existing Contacts” (added in version 3.8.0) leaves any contact already in your CRM completely untouched during the run. Only net-new contacts get created. This is the cleanest option when you are adding a fresh batch and have no intention of updating anything on records already in your database.
“Trigger Automations for Tag & List Changes” is the highest-risk setting, and it is worth understanding exactly why before you touch it.
By default it is off. When it is off, the import is inert from an automation standpoint: no workflow fires, no emails go out, no sequences start, regardless of what tags or lists you assign during the run. That is the safe default for migrations, cold list imports, and any situation where you are not 100% certain of your automation setup.
When you turn it on, every automation that watches a tag or list assignment runs against every contact in your CSV the moment their row is processed. If your welcome sequence sends three emails over five days, your entire imported list enters that sequence immediately. If you have a re-engagement automation on a “winback” tag, every contact you tag “winback” during import enters that sequence without any further action on your part.
That is the power and the risk in the same setting.
When to enable it: use it when you have a confirmed opt-in batch (say, event sign-ups) and a tested automation already waiting on the exact tag or list you are assigning during import. The automation should be live and verified before you run. When to leave it off: any cold list migration, any re-import where you are not 100% certain of the automation setup, and any time you have not done a test run on a small batch first. For cold list migrations, leave it off and enrol contacts in automations deliberately afterward using FunnelKit Lists and Tags.
The judgment call is yours. You know whether the contacts genuinely opted in and whether the automation has been tested. If you are unsure, test on a 5-row CSV first and check the FunnelKit Automation Logs before committing to the full run.
What to Do When a Column Has No Matching Field
Your old CRM probably had fields that FunnelKit does not ship with out of the box: a loyalty tier, a preferred store location, a referral source. If you skip those columns during mapping, that data is gone from the import permanently.
The fix is to create a custom field before you map. Go to Contacts, then Fields, and you will see all the fields in FunnelKit Automations. Click “Create Field,” then fill in the field name, field type, and the group you want it associated with.
You can create different types of fields: Text input (a single line of text), Number (numerical values only), and Text area (multi-line text). Date and DateTime field types are also available for time-sensitive data.
Once you save the new field, go back to your import mapping screen and that field will appear in the dropdown. Map your CSV column to it and the data carries through.
One bonus: all contact fields appear separately in merge tags under FunnelKit Automations, which helps you run custom field-based automations easily. So any field you create for import also becomes available in your email templates and automation conditions immediately.
How to Audit Past Imports
FunnelKit keeps a full record of every import you have run. This is useful when a contact complains they were added without consent, or you need to verify that a specific batch landed.
The View Import List page lets you track all contact imports with status, source, contact count, date, and detailed import insights. To access it, navigate to FunnelKit Automations, then Contacts, then expand the Export option and hit “View List.” You will land on a page showing all previous imports with real-time status updates, import source, number of contacts successfully imported, and date and time for each import.
In the details view pop-up, you will find the import type, number of contacts, tags, and list. Clicking the three-dot menu next to any import and selecting View gives you that breakdown.
Use this screen after every import run, not just when something seems wrong. Catching a discrepancy between the row count in your CSV and the “contacts successfully imported” number is far easier here than hunting through individual contact records.
When You Do Want to Fire Automations on Import
There are legitimate reasons to enable “Trigger Automations for Tag & List Changes” on import. Here are two clean use cases.
Onboarding a new segment you acquired offline. You collected a batch of opt-in subscribers at an in-person event. You have a “new subscriber” automation that sends a three-email welcome series. Enabling the trigger means every person in that CSV enters the welcome sequence as soon as they are imported, without you having to enrol them manually.
Reactivating lapsed contacts. You pull a list of customers who have not bought in 12 months from your old CRM, tag them “re-engagement,” and have a win-back automation waiting on that tag. Enabling the trigger fires the win-back sequence the moment the import runs.
In both cases the key is that the automation and the tag already exist and are set up correctly before you run the import. The judgment call is yours: you know whether the contacts genuinely opted in and whether the automation has been tested. If you are unsure, test on a 5-row CSV first. Check the logs before you run the full list. The FunnelKit Automation Logs screen shows you exactly what triggered and when, so you can verify the test run before committing to the full import.
If your automation is not firing after import, the most common cause is that the “Trigger Automations for Tag & List Changes” option was off. That is not a bug. It is the expected behaviour when the setting is disabled. The other common causes are covered in FunnelKit Automation Not Triggering.
Do You Need a Paid Plan to Import from CSV?
No. As of version 3.7.0, FunnelKit moved all contact import functionality, including CSV, WordPress, WooCommerce, and direct API integrations (Mailchimp, ActiveCampaign, Kit), from Pro to Lite. The import UI is available on the free plan.
That said, the Lite plan is not identical to Pro for everything related to contacts. The Lite plan gives you the full import pipeline: file upload, field mapping, Contact Profile settings, the error log, and the View Import List page. That is enough to migrate a list cleanly. What stays behind the Pro paywall are features you will want as your list grows: smart segmentation (RFM scoring, engagement filters, geography, order value, and more), bulk contact actions (updating tags, fields, or statuses across many contacts at once), contact journeys (the per-contact visual view of which automation steps they moved through), and broadcasts. If you need any of those, you need Pro.
On contacts themselves: FunnelKit does not impose a contact count cap on either plan. The CRM stores contacts without a hard limit, and you do not pay more as your list grows. Your practical ceiling is your server’s storage capacity and your sending service’s sending limits, not FunnelKit’s. Plan for both as your list scales.
What you do need is FunnelKit Automations installed (the Lite version is free on WordPress.org). The import UI lives entirely within that plugin, separate from FunnelKit Funnel Builder. If you have not connected an email sending service yet, do that before you import, otherwise your automation emails will have nowhere to go. The setup is covered in FunnelKit Sending Service.
Worked Example: Migrating from Mailchimp to FunnelKit
Here is a realistic walkthrough so you can see the whole process end to end before you run your own import.
Scenario: You are leaving Mailchimp. You have 1,200 contacts with first name, last name, email, a custom “customer tier” field (Bronze/Silver/Gold), and a subscribed/unsubscribed status column.
- Export from Mailchimp. Download the full audience as CSV. Mailchimp exports status as “subscribed” or “unsubscribed” in a column called “MEMBER_RATING” or similar. Rename your columns to something readable: email, first_name, last_name, customer_tier, status.
- Clean the file. Check that every email cell looks valid. Remove any rows where email is blank. Confirm no country column uses full country names. Save as CSV (UTF-8).
- Create the custom field. In FunnelKit Automations, go to Contacts, then Fields, click “Create Field,” name it “Customer Tier,” set the type to Text input, and save.
- Start the import. Navigate to FunnelKit Automations, then Contacts. Click Import, then Create New. Choose CSV. Upload your file.
- Map the fields. Match email to Email, first_name to First Name, last_name to Last Name, customer_tier to your new “Customer Tier” field, status to Status.
- Set the Contact Profile settings. Since this is a fresh migration with no matching records already in FunnelKit, the overwrite options are largely irrelevant on the first run, but it is still good practice to set them intentionally. Leave “Do Not Overwrite Empty Fields” off and “Allow Field Information to be Overwritten” off. Leave “Trigger Automations” off: at this stage you have not tested your welcome automation against a FunnelKit contact, and firing it immediately on 1,200 people before you have verified the sequence works is a mistake that is hard to walk back. If you want to be sure existing contacts (if any) are not touched at all, enable “Skip Existing Contacts.”
- Hit Import and wait. With 1,200 contacts, this should complete quickly on a typical server. Processing time scales with list size and server resources.
- Download the error log. Fix any failed rows (usually malformed email addresses) and re-import just those rows.
- Verify. Open a contact record and confirm the Customer Tier field populated with the correct Bronze/Silver/Gold value. Check a few email addresses against your original Mailchimp export to confirm they landed. Check a tag or two against your original data.
- Decide your automation entry point. Now that your contacts are in FunnelKit, you have two options. If you want them to enter a welcome sequence, go to FunnelKit Lists and Tags and assign the relevant tag or list deliberately, with the “Trigger Automations” setting on, to a small test batch first. Confirm the sequence fires correctly in the FunnelKit Automation Logs. Then roll it out to the full 1,200. If you are skipping the welcome sequence entirely and moving straight to broadcasts, head to FunnelKit Schedule Broadcast and segment your imported contacts by Customer Tier before you send your first email.
That last step is where most operators miss the opportunity. Importing is the easy part. The value is in what you do with the segments afterward.
FAQ
Does FunnelKit import contacts from CSV on the free plan?
Yes. As of FunnelKit Automations 3.7.0, all contact import tools including CSV import were moved from Pro to Lite. You do not need a paid plan to run a CSV import. The full import pipeline (file upload, field mapping, Contact Profile settings, error log, and View Import List) is available free. What stays Pro-only are features you will want as you scale: smart segmentation, bulk contact actions, contact journeys, and broadcasts.
What happens to contacts that already exist when I import again?
That depends on the Contact Profile settings you configure. “Do Not Overwrite Empty Fields” keeps existing data intact if the CSV cell is blank. “Allow Field Information to be Overwritten” updates existing fields with new values from the CSV. If you leave both off, FunnelKit will still create the contact if it does not exist, but will not modify an existing record’s fields. As of version 3.8.0, there is also a “Skip Existing Contacts” option to leave existing records completely untouched during import.
Why are some contacts missing after my CSV import?
Open the error log immediately after the import completes. The most common causes are invalid email addresses (malformed or blank), country fields that are not in 2-digit ISO format, and date fields not formatted as YYYY-MM-DD. Fix those rows in your CSV and re-import just the failed contacts.
Can I trigger automations during a CSV import?
Yes, but only if you deliberately enable “Trigger Automations for Tag & List Changes” in the Contact Profile section before you hit Import. When that setting is off (the default), importing a contact fires zero automations, even if the import assigns a tag or adds them to a list that an automation is watching. When you turn it on, every automation watching a relevant tag or list assignment runs against every imported contact as their row is processed. Enable it only when you have confirmed opt-in contacts and have already tested the automation on a small batch. The judgment call on whether your list and automation are ready is yours to make.
How do I import a field that FunnelKit does not have by default?
Create a custom field first. Go to Contacts, then Fields, and click “Create Field.” Set the name, type (text, number, text area, date), and field group, then save. That field immediately appears as a mapping option in the import screen. Any custom field you create also becomes available as a merge tag in emails and as a condition in automations.
Where do I check the status of a past import?
Navigate to FunnelKit Automations, then Contacts, expand the Export option, and click “View List.” The View Import List page shows every import you have run, including the source, number of contacts successfully imported, and date and time. Click the three-dot menu next to any import and select View to see tags and lists applied during that run.
Sources:
Sources: FunnelKit Docs: Import Contacts from CSV; FunnelKit Docs: Contacts (View and Manage); FunnelKit Docs: Adding Fields; FunnelKit Docs: View Import List; FunnelKit Automations 3.7.0 Release Notes; FunnelKit Latest Updates; FunnelKit Docs: Import Contacts from WooCommerce; FunnelKit Lite vs Pro Feature Comparison; FunnelKit Automations on WordPress.org (changelog). All documentation accessed November 2026.
Brian Kasday spent forty years in direct-response marketing before rebuilding the whole operation as a one-person shop. He writes The Operator’s Library — including “The Missing Manual for FunnelKit” — for operators who’d rather build it themselves than wait on someone else.
Get the Builder’s Companion Kit — the free checklists and templates that pair with this guide: mmsvegas.com/op/funnelkit-resources/.
This guide fixes one FunnelKit step. The Missing Manual for FunnelKit covers the whole checkout system. See the manual →
More FunnelKit guides
Free · FunnelKit Operator Toolkit
Building checkouts in FunnelKit?
Get the free operator toolkit — order-bump templates, checkout checklists, and a note when what you just read changes.
Get the free toolkit →