
The 30-second answer
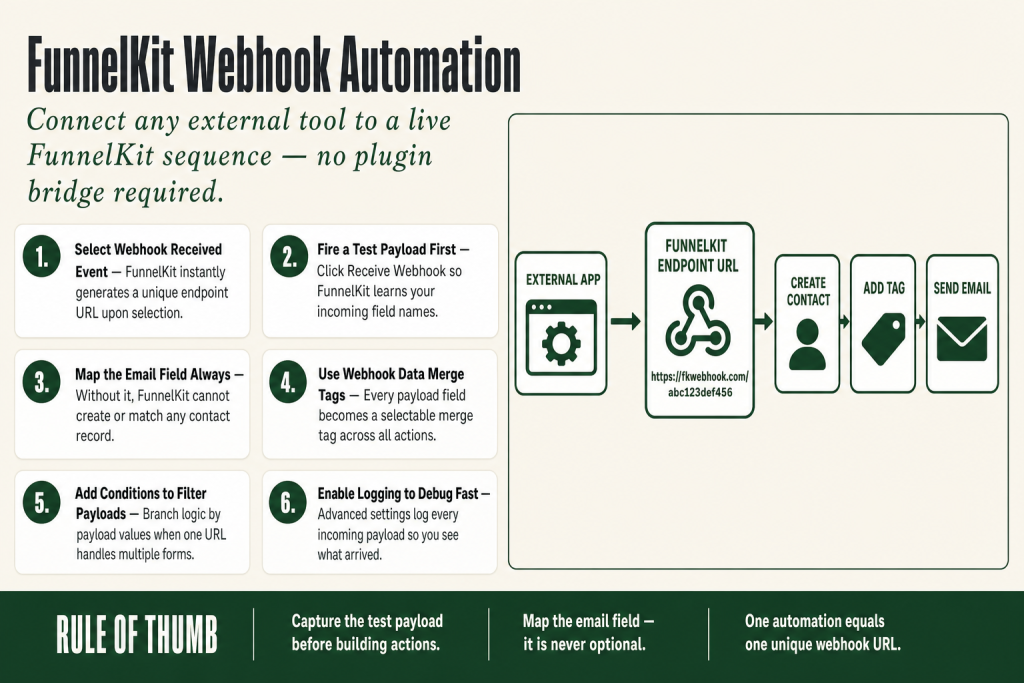
- Webhook Received is a built-in FunnelKit Automations event. Go to Automations, create a new automation from scratch, and select “Webhook Received” as the event. A unique endpoint URL appears immediately.
- Copy that URL into your sending tool. Paste it wherever the external app sends its webhook, Zapier, Make, ConvertBox, ActiveCampaign, a custom script, anywhere.
- Fire a test payload, then click “Receive Webhook” inside the trigger settings. FunnelKit captures the field names from the test so you can map them.
- Map the email field. FunnelKit needs to know which incoming field is the contact email. Without this mapping a contact record is not created.
- Use Webhook Data merge tags in your actions. Every field in the payload becomes a selectable merge tag you can paste into Create Contact, Update Fields, Send Email, or any other action.
- Add conditions to filter by payload values before the sequence continues, useful when one endpoint handles multiple form types or languages.
- Enable webhook logging in Advanced settings to see exactly what arrived when nothing fires as expected.
Take this fix into your next scenario. The free Builder’s Companion Kit collects the checklists and templates that pair with this guide — so next time, you start from a template, not a blank page. Grab it free →
- How the Webhook Received Trigger Works
- Step 1: Create the Automation and Select the Event
- Step 2: Paste the URL Into Your Sending Tool and Fire a Test
- Step 3: Map the Email Field, This Step Is Not Optional
- Step 4: Build Actions Using Webhook Data Merge Tags
- Step 5: Filter With Webhook Conditions
- Worked Example: FunnelKit Webhook Automation for a Typeform Lead
- Enable Webhook Logging for Faster Debugging
- Incoming vs. Outgoing: Which Direction Are You Configuring?
- FAQ
FunnelKit webhook automation is the shortest path between an outside tool and a live sequence on your WooCommerce site. Typeform finishes, Calendly confirms a booking, Make (Integromat) runs a scenario, your custom app ships an event, any of those can fire a full FunnelKit automation the moment the data lands, without a plugin bridge or a paid Zapier subscription. The mechanism is a native trigger called Webhook Receivedand it generates a unique endpoint URL the instant you select it. Paste that URL into whatever is sending the data, click a test button, and the automation is live. This article walks through every step: creating the automation, capturing the test payload, mapping fields, adding conditions, and debugging when nothing fires.
How the Webhook Received Trigger Works
Webhooks are the means for FunnelKit Automations to send and receive real-time data from other applications. The incoming side works like a mailbox with a unique address. When you select the Webhook Received event, FunnelKit generates a URL specific to that one automation. Any HTTP POST to that URL wakes the automation up, hands it the payload, and the sequence runs with that data in scope.
This is different from a native WooCommerce or FunnelKit event like “Order Paid” or “Tag Added.” Those fire because something happened inside WordPress. Webhook Received fires because something outside WordPress told it to. That distinction matters for troubleshooting: if the automation does not run, the first question is always whether the external tool actually sent the request, not whether FunnelKit is broken.
The trigger is native, meaning you do not need a third-party connector plugin to use it. Any tool that can send an HTTP POST request works: Make, Zapier, n8n, ActiveCampaign, ConvertBox, a custom PHP script, or a headless app. If your automation is not firing at all, rule out the external sender first before digging into FunnelKit settings.
Step 1: Create the Automation and Select the Event
Go to FunnelKit Automations in your WordPress dashboard. Click Create Automation. On the recipes screen, choose Start from Scratch and give the automation a descriptive name, something like “Typeform Lead Capture” or “Make: New Course Enrollment” so you can find it later. Click Create.
You land on the canvas with a prompt to select an event. Click Select an Eventfind Webhook Received in the list, and click it. Click Done.
FunnelKit immediately generates a unique webhook URL tied to this automation. Click the trigger block on the canvas to open its settings panel. You will see the URL sitting there, ready to copy. Copy it now, you need it in the next step.
One URL equals one automation. If you want two different tools to trigger two different sequences, create two automations and use their respective URLs. You can, however, route multiple forms from the same tool into one URL and then use conditions to split the logic once the data arrives.
Step 2: Paste the URL Into Your Sending Tool and Fire a Test
Go to whatever is sending the data and paste the copied URL into its webhook destination field. Every platform names this differently: “Webhook URL,” “Endpoint,” “Target URL,” “Callback URL”, they all mean the same thing.
Once the URL is in place, trigger a test event from the sending tool. Most tools have a “Send Test” button. For a custom script, run it manually with sample data. The goal is to get a real HTTP POST to arrive at FunnelKit before you build anything else in the automation.
Now go back to FunnelKit, open the Webhook Received trigger panel, and click Receive Webhook. FunnelKit reads the most recent payload it received and displays the field names and sample values it found. This is how the system learns what fields are available for merge tags downstream.
If no data appears after clicking Receive Webhook, the test payload never arrived. Check that the sending tool actually fired, that you pasted the correct URL, and that your server is publicly reachable. A firewall or a localhost install will block the request silently.
If you want a neutral test endpoint to verify the payload looks correct before routing it to FunnelKit, paste the URL into Webhook.site first. You can see the exact JSON structure your sender is transmitting, then adjust field names if needed before connecting to FunnelKit.
Step 3: Map the Email Field, This Step Is Not Optional
After FunnelKit captures the test payload, the trigger panel shows a field labeled something like Select Email Field or similar. This is where you tell FunnelKit which key in the incoming JSON contains the contact’s email address.
This step is the most skipped and the most consequential. Without the email mapping, FunnelKit cannot associate the incoming data with a contact record. Downstream actions that rely on a contact, “Create Contact,” “Add Tag,” “Send Email”, will either fail silently or create orphaned records. Map it every time, even if you are only running a server-to-server task where the contact is incidental.
If your payload uses a non-obvious key name for email (some tools send it as subscriber_email or contact[email]), make sure the test payload you sent uses that exact key. FunnelKit only lists field names it actually saw in the captured payload.
For related troubleshooting on contacts not appearing after a trigger fires, see FunnelKit Automations Contact Not Added.
Step 4: Build Actions Using Webhook Data Merge Tags
Every field in the captured payload is now available as a merge tag under the Webhook Data group. Click the Merge Tags button inside any action, expand Webhook Data, select the field you want, and copy the tag. Paste it into the corresponding field in your action.
A typical sequence for an incoming lead looks like this:
- Create Contactpaste the Webhook Data merge tags for email, first name, and last name into the respective fields.
- Add Tagsapply a source tag so you know where this contact came from.
- Update Fieldspush any additional payload data (phone, company, plan tier) into custom contact fields.
- Send Emailthe welcome or confirmation message, now fully personalized with the contact’s name from the webhook payload.
You are not limited to contact-management actions. The payload data is in scope for any action in the sequence: HTTP Request (to pass data further downstream), Create Coupon, update a Google Sheet row, send a Slack message. The merge tag approach is consistent across all of them.
If your merge tags are rendering blank or as literal text instead of real values, see FunnelKit Merge Tags Not Working for a full diagnosis checklist.
Step 5: Filter With Webhook Conditions
If one URL receives data from multiple forms or contexts, you will want to branch the sequence based on payload values. FunnelKit supports this with webhook-specific conditions.
Inside the canvas, add a Condition step after the trigger. Click Add New Condition and select Webhook. You can then evaluate any field from the payload against a value you specify. For example: if the payload contains a language field, you can route English-language contacts down one branch and route everything else down another.
You can also use conditions to gate the sequence entirely. A common pattern: check whether the contact already exists as a subscriber before running Create Contact, and exit the automation early if they do. This prevents duplicate records when the same person submits multiple forms that all point to the same webhook URL.
Conditions here evaluate the raw payload data, not the contact record, so they run on whatever arrived in the POST, not on what FunnelKit already knows about that email address. Keep that distinction in mind when designing your logic.
Worked Example: FunnelKit Webhook Automation for a Typeform Lead
Here is a concrete end-to-end example using Typeform as the sender. The goal: when someone completes a lead magnet form, create a contact in FunnelKit, tag them by lead source, and send a delivery email.
- In FunnelKit: Create a new automation, name it “Typeform: Lead Magnet,” select Webhook Received, copy the URL.
- In Typeform: Go to your form, open Connect, find Webhooks, paste the FunnelKit URL, and send a test response by submitting the form yourself.
- Back in FunnelKit: Open the Webhook Received trigger, click Receive Webhook. You see fields like
form_response.answers[0].emailor however Typeform structures its payload. Map the email field. - Add a Create Contact action. Use Webhook Data merge tags to populate email, first name, last name.
- Add an Add Tags action. Apply the tag
typeform-lead-magnet. - Add a Send Email action. Write the delivery email. Personalize the greeting with the contact’s first name merge tag.
- Toggle the automation to Active. Submit the form one more time as a real test. Check Contacts to confirm the record appeared, and check your inbox for the delivery email.
The whole setup takes under fifteen minutes once you understand the field-mapping step. The part operators most often miss is step 3: they build out the whole action sequence before capturing a test payload, so no merge tags are available and the actions go in blank. Always capture the payload first.
For context on how delays interact with sequences like this one, see FunnelKit Delay Not Working.
Enable Webhook Logging for Faster Debugging
When a webhook fires and nothing happens, the fastest diagnostic tool is the built-in webhook log. Go to FunnelKit Automationsopen Settingsthen Advanced. Find the option labeled Enable Logs for Webhook Received Event Automation and turn it on. FunnelKit will start writing the raw data from every incoming webhook call to a log file so you can see exactly what arrived and when.
There is a separate toggle, Enable Logs for Automation Stepsthat records step-by-step execution inside the automation itself. Turn both on when something is not working; turn the webhook log back off once things are running cleanly, since logging every payload on a busy site adds write overhead.
Common failure patterns the logs surface quickly: the payload arrived but the email field was empty (so no contact was created), the payload never arrived at all (a sender-side problem), or the payload arrived with different field names than what you mapped (the test and live payloads diverged).
Verify the log location in your Advanced settings panel, the log filename will include a unique identifier for the automation.
Incoming vs. Outgoing: Which Direction Are You Configuring?
FunnelKit Automations handles webhooks in both directions and the docs cover both. This article is entirely about incoming webhooksan outside tool posts data to FunnelKit and FunnelKit reacts.
The outgoing direction is the reverse: a native FunnelKit event fires (like Order Paid or Tag Added) and FunnelKit pushes data to an external URL using an HTTP Request action. You configure that as an action step, not a trigger. The HTTP Request action supports GET, POST, and PUT methods, and you compose the payload body using merge tags the same way.
If you need both, receive data from tool A and push a result back to tool A, you combine them: one Webhook Received trigger, then actions, then an HTTP Request action at the end of the sequence. The ActiveCampaign integration pattern does exactly this: FunnelKit receives a webhook, creates a personalized coupon, then sends the coupon code back via an outgoing HTTP request.
FAQ
does funnelkit webhook automation require a paid plan
The Webhook Received trigger is part of FunnelKit Automations. Verify with FunnelKit’s current pricing page which tier includes it, as feature availability can change between plan levels. Check funnelkit.com directly before assuming it is available on a free or entry-level plan.
what format does funnelkit expect the webhook payload to be in
FunnelKit reads standard JSON posted to the endpoint URL. The field names you use in the payload become the field names available in Webhook Data merge tags, so keep them readable. After sending a test, click Receive Webhook inside the trigger to confirm FunnelKit parsed the payload correctly.
can two automations use the same webhook url
No. Each automation generates its own unique endpoint URL. If you want one incoming webhook to trigger multiple automations, you need a relay tool like Make to fan the payload out to multiple FunnelKit URLs, or you handle the branching inside a single automation using conditions.
why does funnelkit webhook automation fire but not create a contact
The most common cause is a missing or incorrect email field mapping in the Webhook Received trigger settings. FunnelKit must know which payload field holds the email address before it can create or match a contact record. Open the trigger, confirm the email mapping is set, and re-test.
can i use webhook data merge tags in email subject lines
Yes. Webhook Data merge tags are available wherever standard merge tags appear in FunnelKit: email subject lines, body content, action field values, and condition rules. Copy the tag from the Merge Tags panel inside the relevant action and paste it in place.
how do i test a funnelkit webhook automation without a real subscriber
Send a test payload from your external tool using dummy data (a real-looking but fake email address works fine), then click Receive Webhook in FunnelKit to capture it. Run the full automation manually against that test contact, then delete the dummy contact afterward. You can also use webhook.site to inspect the raw payload before pointing it at FunnelKit.
Sources:
Sources: FunnelKit Docs: Incoming Webhooks; FunnelKit Docs: Outgoing Webhooks; FunnelKit Docs: Webhook Conditions; FunnelKit Docs: Automation Events; FunnelKit Docs: Advanced Settings (Logging); FunnelKit Docs: ActiveCampaign Integration; FunnelKit Docs: ConvertBox via Webhooks. All documentation accessed September 2026.
Brian Kasday spent forty years in direct-response marketing before rebuilding the whole operation as a one-person shop. He writes The Operator’s Library — including “The Missing Manual for FunnelKit” — for operators who’d rather build it themselves than wait on someone else.
Get the Builder’s Companion Kit — the free checklists and templates that pair with this guide: mmsvegas.com/op/funnelkit-resources/.
This guide fixes one FunnelKit step. The Missing Manual for FunnelKit covers the whole checkout system. See the manual →
More FunnelKit guides
Free · FunnelKit Operator Toolkit
Building checkouts in FunnelKit?
Get the free operator toolkit — order-bump templates, checkout checklists, and a note when what you just read changes.
Get the free toolkit →