
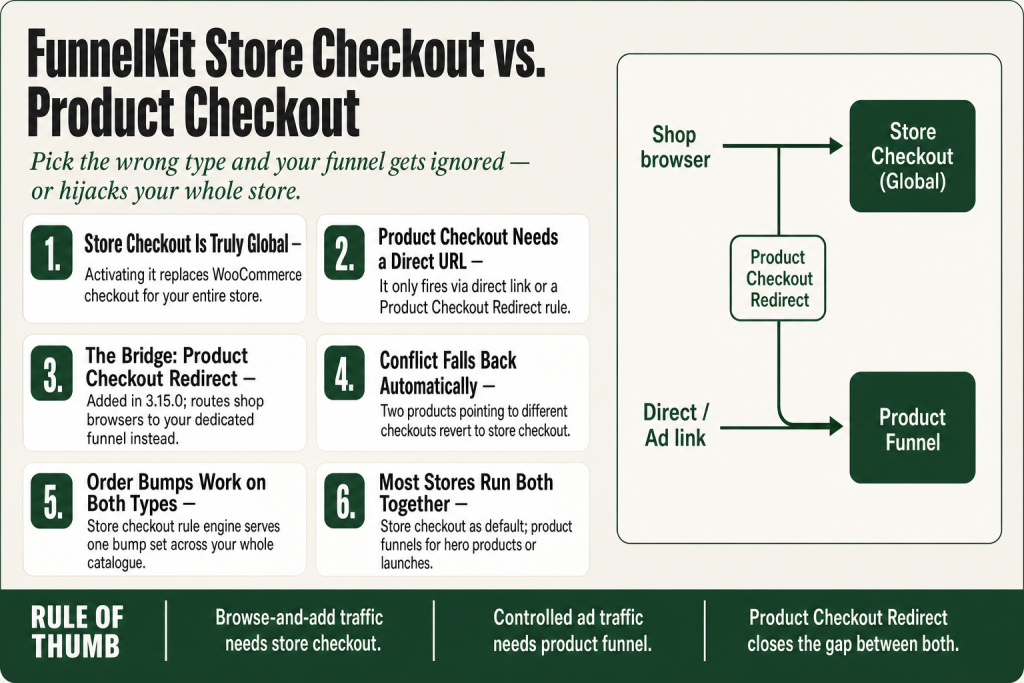
The 30-second answer
- FunnelKit Store Checkout (also called Global Checkout): replaces the default WooCommerce checkout site-wide. Any product added to the cart from any shop or product page flows through it. Built under FunnelKit ⇒ Store Checkout.
- Product-specific checkout: a dedicated funnel page you link directly to one or more named products. The buyer lands on it via a direct URL or via a Product Checkout Redirect rule on that product. Built under FunnelKit ⇒ Funnels ⇒ Create New Funnel.
- The real question: does the buyer browse your shop and add to cart (FunnelKit store checkout is typically the better fit), or do you send them straight to a sales page built around one product (product-specific checkout is usually the right call)?
- Conflict rule: if a shopper’s cart contains products pointing to two different dedicated checkouts, FunnelKit falls back to your store checkout automatically.
- Bridge option: since Funnel Builder 3.15.0 you can assign a product-specific checkout to any individual product or category via Product Checkout Redirect, a per-product and per-category setting. This is specifically useful when a product also lives in your shop and you need shop browsers to hit your optimized funnel instead of the store checkout, without a direct URL.
- Order bumps and upsells work on both types, but the store checkout’s rule engine lets one set of bumps serve every product in your catalogue without duplicating funnels.
Take this fix into your next scenario. The free Builder’s Companion Kit collects the checklists and templates that pair with this guide — so next time, you start from a template, not a blank page. Grab it free →
- What the FunnelKit Store Checkout Actually Does
- What a Product-Specific Checkout Does Differently
- The Bridge: Product Checkout Redirect (Funnel Builder 3.15.0+)
- Which Type of Checkout Do You Actually Need?
- Worked Example: Running Both a FunnelKit Store Checkout and a Product Funnel Together
- The Mistakes That Cost People Hours
- FAQ
The FunnelKit store checkout and a product-specific checkout look almost identical once you’re inside the editor, and that’s exactly why operators keep picking the wrong one. You build the wrong type, wire everything up, then wonder why the cart ignores your funnel entirely, or why every buyer on your whole site lands on a page built for one product. The distinction isn’t cosmetic. It changes how FunnelKit routes traffic, what products appear at checkout, and where your order bumps and upsells fire. Get it straight once and you’ll stop rebuilding funnels you didn’t need to build.
What the FunnelKit Store Checkout Actually Does
The FunnelKit store checkout is FunnelKit’s global checkout funnel. FunnelKit’s own documentation titles this feature ‘Creating a Store Checkout (Global Checkout Funnel),’ so both names are current and official. ‘Store Checkout’ is what appears in the sidebar menu; ‘Global Checkout’ is how the docs describe what it does. You’ll see both used interchangeably in the FunnelKit interface and documentation, and either is correct. You build it once and it takes over the WooCommerce checkout URL for your entire store. Every buyer who adds any product to the cart from any page (shop, category, widget, search result) arrives at this page, regardless of what they’re buying.
You create it at FunnelKit ⇒ Store Checkout. That separate menu location is the clearest signal FunnelKit gives you that this is a different animal. The process is straightforward: navigate to FunnelKit ⇒ Store Checkout, click Create Store Checkout, choose a template, select your number of steps, name your funnel, and import it. Once you’ve customized the page to your liking, go back to the funnel and turn the toggle to activate your Store Checkout. After you activate it, it replaces your default WooCommerce checkout. You don’t redirect individual products, you don’t paste a URL anywhere. It just takes over. You can verify it’s working by adding any product to your cart and clicking proceed to checkout. If you ever need to revert, disabling the toggle in FunnelKit ⇒ Store Checkout switches your store back to the WooCommerce default immediately.
No special permissions beyond standard WordPress admin access are required to activate the FunnelKit store checkout. The activation toggle is available to any user with access to the FunnelKit menu. There are no additional plugin-level approval steps documented in the official FunnelKit docs.
Because every order flows through it, the FunnelKit store checkout is the right home for things that apply across your whole catalogue: your brand’s form layout, your express pay buttons (Apple Pay, Google Pay), your address autocomplete, and your global trust signals. It also supports order bumps and one-click upsells, and here’s where the rule engine earns its keep.
You can stack multiple order bumps on a single FunnelKit store checkout and use conditional rules to show different bumps to different buyers. A sports-category item in the cart triggers a wristband bump. A beauty product triggers a skincare add-on. Same checkout page, different offers, no extra funnels.
If you want to dig into how those bump rules are configured, FunnelKit Order Bump Not Showing covers every condition that can prevent a rule from firing correctly.
What a Product-Specific Checkout Does Differently
A product-specific checkout is a standalone funnel page built around one product, or a small named set of products. You build it under FunnelKit ⇒ Funnels ⇒ Create New Funnel and then use the Products tab inside the checkout step to pin specific products to that page.
That Products tab is the mechanical dividing line between the two types. On a FunnelKit store checkout (global checkout) you leave it empty, because the cart contents come from the buyer’s browsing session. On a product-specific checkout you populate it, because FunnelKit needs to know what to put in the cart when someone arrives directly at that URL.
The classic use case: you’re running a launch campaign for one course or one physical product. You build a sales page, run ads to it, and the call-to-action links directly to your product checkout URL. The buyer never visits your shop. They see a page built entirely around that one item, with testimonials, a product image or video, and an order bump tailored to that exact buyer intent.
Because the cart is controlled by the checkout itself, the experience is tighter and more focused. There’s no order summary showing five other products from someone’s earlier browsing session. It’s a clean transaction.
The tradeoff: if that same product also lives in your shop and someone adds it from the shop page instead of clicking your ad, they hit the FunnelKit store checkout, not your product funnel. That gap is exactly what Product Checkout Redirect closes, and it’s the specific problem that feature was designed to solve. Covered in the next section.
For a full walkthrough on building this type of funnel from the beginning, see How to Set Up FunnelKit Checkout from Scratch.
The Bridge: Product Checkout Redirect (Funnel Builder 3.15.0+)
Before version 3.15.0, the two checkout types were completely separate lanes. Shop browsers always hit the FunnelKit store checkout. Direct-link buyers always hit the product funnel. There was no overlap.
Funnel Builder 3.15.0 introduced the Product Checkout Redirect feature specifically to close that gap: when a product appears in your shop and you also have a dedicated funnel for it, this setting ensures shop browsers land on your optimized funnel instead of the generic store checkout. It’s a setting available at two levels: the individual product and the product category. Neither is global. You assign it explicitly to the products or categories where you want it, and everything else continues to route through your FunnelKit store checkout as normal.
To set it up at the product level, go to Products in your WordPress admin, edit the product, and find the Product Checkout Redirect section in the product settings. Search for the dedicated checkout page you built and select it. Click Update. Done. Now every route to that product, whether from the shop page, search results, a widget, or a direct link, lands on your optimized funnel.
Category-level redirect works the same way: go to Products ⇒ Categories, edit the category, and assign the checkout page. Every product in that category inherits the redirect automatically. If you’ve set both a category redirect and a product-level redirect on the same product, the product-level setting wins.
The conflict rule also matters here: if a shopper adds two products to the cart and each points to a different dedicated checkout, FunnelKit detects the conflict and falls back to your FunnelKit store checkout. The dedicated redirect only fires when the cart resolves cleanly to a single checkout assignment.
Which Type of Checkout Do You Actually Need?
Think of it like a hotel lobby versus a private VIP suite. The FunnelKit store checkout is the lobby: everyone passes through it, the design works for all guests, and smart signage (bump rules) routes different people to different offers. The product-specific checkout is the suite: one guest, one tailored environment, nothing else visible.
The FunnelKit store checkout tends to be the better fit when:
- Buyers browse your shop and add whatever they want to the cart. You can’t predict the cart contents ahead of time.
- You sell many products and want one consistent checkout experience without maintaining a separate funnel per product.
- Your order bumps and upsells vary by cart contents, not by product landing page. The rule engine handles this cleanly from a single checkout.
- You want cart abandonment tracking to work across your whole store without gaps. A single FunnelKit store checkout is the most reliable surface for this.
A product-specific checkout tends to be the better fit when:
- You’re driving paid traffic to a dedicated offer page and you control the buyer’s entire path from ad to confirmation.
- The product needs its own brand treatment: different copy, a product video embedded in the checkout, a custom trust badge layout, an offer-specific bump that would be irrelevant on any other product.
- You’re selling a digital product or course and want a stripped-down, single-step form with no shipping fields cluttering the experience.
- You’re running a limited promotion and want one URL you can hand to affiliates or put in email campaigns.
You can run both simultaneously. Most operators with more than a handful of products end up with one active FunnelKit store checkout as the default and one or two product-specific checkouts for their hero products or launch campaigns. Product Checkout Redirect ties the two together: products that also appear in your shop get redirected to their dedicated funnel automatically, so no buyer falls through to the generic store checkout by accident.
If your order bumps aren’t showing up correctly after you choose a checkout type, the troubleshooting path is in FunnelKit Order Bump Not Showing. If your stats look wrong after the switch, check FunnelKit Stats Not Tracking.
Worked Example: Running Both a FunnelKit Store Checkout and a Product Funnel Together
Here’s a realistic setup for a WooCommerce store selling fitness equipment (10+ products) plus one flagship online program.
Step 1: Build the FunnelKit store checkout. Go to FunnelKit ⇒ Store Checkout, click Create Store Checkout, pick a template, select your steps (two-step works well for physical goods: contact info first, payment second), name your funnel, and import it. Customize the page, then go back to the funnel and turn the toggle to activate your Store Checkout. This becomes the fallback for all cart-based shopping.
Step 2: Add rule-based order bumps to the FunnelKit store checkout. Create a bump for resistance bands that shows only when the cart contains products from the ‘Weights’ category. Create a second bump for a training guide that shows on all other orders. One checkout, two bumps, zero duplicated funnels.
Step 3: Build a product-specific checkout for the flagship program. Go to FunnelKit ⇒ Funnels ⇒ Create New Funnel. Add the program product in the Products tab. Design the page with program-specific social proof and a course-specific order bump (a related workshop). The URL is what you hand to affiliates and put in email campaigns.
Step 4: Use Product Checkout Redirect to close the shop-browser gap. Edit the flagship program’s product in WordPress. In the Product Checkout Redirect setting on that product’s edit screen, select the dedicated checkout you just built. Now if a buyer finds the program through your shop page and adds it to cart, they still land on the product funnel instead of the generic FunnelKit store checkout. This is exactly the scenario Product Checkout Redirect was built for: a product that lives in both your shop and a dedicated funnel. This redirect is configured at the product level, not globally, so every other product in the store is unaffected.
Result: All other products flow through the FunnelKit store checkout with rule-based bumps. The flagship program always hits its own funnel, no matter how the buyer arrived. No funnel duplication, no gaps.
If you’re also running abandoned cart recovery, make sure your cart abandonment automation is connected to the FunnelKit store checkout, not only the product funnel. The full setup is in FunnelKit Cart Abandonment Setup.
The Mistakes That Cost People Hours
Building a product-specific checkout and expecting it to catch store traffic. It won’t. If you create a funnel under Funnels ⇒ Create New Funnel and pin products to it, that page only activates when someone lands on its URL directly, or when a Product Checkout Redirect routes them there. Your shop’s ‘Proceed to Checkout’ button still hits the WooCommerce default (or your FunnelKit store checkout if you built and activated one).
Leaving WooCommerce’s default checkout live. If you haven’t built and activated a FunnelKit store checkout, the default WooCommerce checkout page is still live. Buyers who add to cart and click checkout land there, bypassing all your FunnelKit work. Build the FunnelKit store checkout even if it’s just a cleaner version of the default, and make sure to turn the activation toggle after customizing and saving. It’s the foundation everything else builds on.
Assuming the FunnelKit store checkout’s Products tab does what the product-specific checkout’s Products tab does. On a global checkout (FunnelKit store checkout), you don’t add products at all: the cart contents come from the buyer’s session. On a product-specific checkout, the Products tab controls what product is injected into the cart when the page loads. Same tab name, different function depending on which type of checkout you’re in.
Pinning the wrong products in a product-specific checkout and then using it as the store checkout. If you leave products pinned and then try to use that funnel as a global checkout, buyers who arrive with different products in their cart may see unexpected behavior. The FunnelKit store checkout should have no products pinned in the Products tab.
Treating Product Checkout Redirect as a global setting. It isn’t. It’s specifically for products that appear in your shop and also have a dedicated funnel. You apply it per-product or per-category, only where you want it. Unassigned products continue to route through your FunnelKit store checkout. Don’t assume that setting it on one product affects anything else in your catalogue.
For issues with checkout fields looking or behaving unexpectedly after switching types, FunnelKit Checkout Fields Customization has the field-level fixes.
FAQ
Can I have both a store checkout and a product-specific checkout active at the same time?
Yes. That’s the standard setup. Your FunnelKit store checkout serves all cart-based traffic as the default. Your product-specific checkouts activate via direct URL or via a Product Checkout Redirect on the product or category level. They coexist without conflict as long as a single cart doesn’t point to two different dedicated checkouts simultaneously.
What happens if someone has two products in their cart that are assigned to different dedicated checkouts?
FunnelKit detects the conflict and falls back to your FunnelKit store checkout automatically. The dedicated redirect only fires when every item in the cart resolves to the same checkout page assignment. This prevents buyers from landing on a funnel built for a product they didn’t intend to focus on.
Do order bumps and one-click upsells work on both checkout types?
Yes. Both checkout types support order bumps and one-click upsells. On the FunnelKit store checkout you can use the rule engine to show different bumps based on cart contents, categories, cart total, customer role, and more. On a product-specific checkout, bumps are typically hardcoded to that product’s funnel because you control exactly what’s in the cart.
Does the FunnelKit store checkout replace the WooCommerce default checkout page automatically?
Not automatically. You still need to complete the activation step. After customizing your FunnelKit store checkout, go back to the funnel and turn the toggle to activate your Store Checkout. That’s the specific action that takes over the WooCommerce checkout flow for your entire store. No special permissions beyond standard WordPress admin access are required. Once enabled, you can verify it by adding any product to your cart and clicking proceed to checkout. Turning the toggle off reverts your site to the default WooCommerce checkout immediately.
What is the Product Checkout Redirect setting and do I need it?
Product Checkout Redirect (introduced in Funnel Builder 3.15.0) was built for a specific situation: you have a dedicated product funnel, but that product also appears in your shop. Without this setting, shop browsers land on your FunnelKit store checkout and bypass your optimized funnel. With it, you assign the dedicated checkout directly on the product or category edit screen, and every route to that product, including from the shop, hits your funnel instead. It’s a per-product and per-category setting, not a global one. Products and categories without an assigned redirect continue to route through your FunnelKit store checkout as normal.
Can I use a product-specific checkout as my store’s global checkout?
Technically you could point traffic to it, but it’s the wrong tool for that job. A product-specific checkout with products pinned in the Products tab will inject those products into every cart, overriding what the buyer actually selected. For site-wide global checkout, build via FunnelKit ⇒ Store Checkout and leave the Products tab empty.
Sources:
Sources: FunnelKit Docs: Creating a Store Checkout (Global Checkout Funnel); FunnelKit Docs: Replace the Default WooCommerce Checkout Page with FunnelKit Store Checkout; FunnelKit Docs: How to Create a Product-Specific Dedicated Checkout Page; FunnelKit Docs: Products Tab (Checkout Pages); FunnelKit Funnel Builder 3.15.0 Release Notes: Product Checkout Redirect; FunnelKit Docs: Introduction to Different Flows; FunnelKit Docs: Rule Engine. All documentation verified September 2026.
Brian Kasday spent forty years in direct-response marketing before rebuilding the whole operation as a one-person shop. He writes The Operator’s Library — including “The Missing Manual for FunnelKit” — for operators who’d rather build it themselves than wait on someone else.
Get the Builder’s Companion Kit — the free checklists and templates that pair with this guide: mmsvegas.com/op/funnelkit-resources/.
This guide fixes one FunnelKit step. The Missing Manual for FunnelKit covers the whole checkout system. See the manual →
More FunnelKit guides
Free · FunnelKit Operator Toolkit
Building checkouts in FunnelKit?
Get the free operator toolkit — order-bump templates, checkout checklists, and a note when what you just read changes.
Get the free toolkit →