
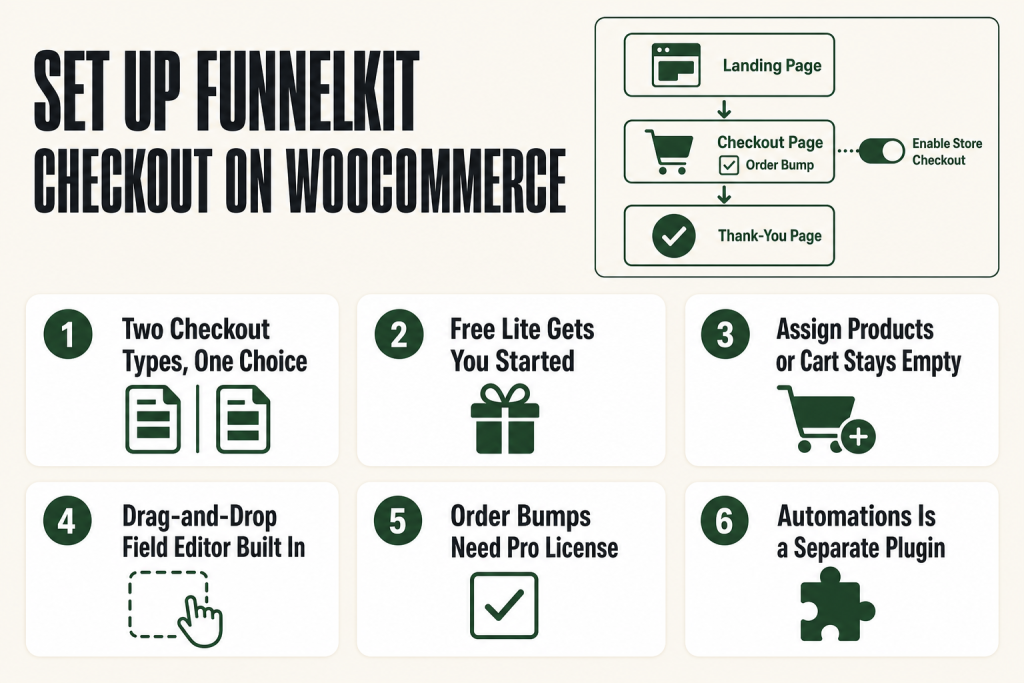
The 30-second answer
- Prerequisite stack: WordPress + WooCommerce active, FunnelKit Funnel Builder (free or Pro) installed, at least one product published.
- Two checkout types exist: Store Checkout (global, replaces your default WooCommerce checkout for all cart traffic) and a dedicated sales-funnel checkout (product-specific, traffic arrives from a direct link or ad).
- Store Checkout path: FunnelKit → Store Checkout → Create Store Checkout → pick template → import → customize → Enable Store Checkout toggle.
- Sales-funnel checkout path: FunnelKit → Funnels → Create New Funnel → Sales Funnels → pick template → import → assign products on the Products tab.
- Fields: Edit them in the Design tab’s drag-and-drop form builder, add sections, add fields, reorder, delete, save.
- Order bump: Requires FunnelKit Pro. Click “Add Order Bump” below the checkout step → name it → pick a skin → add product → design content → save.
- Going live: For Store Checkout, flip the Enable Store Checkout toggle. For a funnel checkout, the page is live once published, send traffic to its URL.
Take this fix into your next scenario. The free Builder’s Companion Kit collects the checklists and templates that pair with this guide, so next time, you start from a template, not a blank page. Grab it free →
- Prerequisites: What You Need Before You Build
- Free vs. Pro: What Each Tier Actually Unlocks
- Installing FunnelKit Funnel Builder
- Store Checkout vs. Sales-Funnel Checkout: Pick the Right One First
- Building a Store Checkout Step by Step
- Building a Dedicated Sales-Funnel Checkout Step by Step
- Editing Checkout Form Fields: The Built-In Drag-and-Drop Editor
- Connecting Products to a Funnel Checkout
- Adding an Order Bump to Your Checkout (Pro Required)
- Worked Example: A Digital Product Store Checkout with One Bump
- Going Live: The Pre-Launch Checklist
- After You Set Up FunnelKit Checkout: Where to Go Next
- FAQ
To set up FunnelKit checkout on WooCommerce you need to make three decisions before you touch a single template: which plugin tier you have, which checkout type you need (Store Checkout or dedicated sales-funnel checkout), and whether any product assignments are required. Get those three things wrong and you’ll spend an afternoon clicking the right buttons in the wrong order. This guide walks every step, prerequisites through going live, so you don’t have to guess.
Prerequisites: What You Need Before You Build
FunnelKit runs on top of WooCommerce, it doesn’t replace it. That means WooCommerce must be installed and active before FunnelKit will do anything useful. If you try to install FunnelKit first, the plugin will tell you immediately.
Beyond WooCommerce, here’s the full prerequisite checklist:
- WordPress self-hosted install. FunnelKit is a WordPress plugin. WordPress.com free/starter plans won’t work. You need a hosting account with WordPress installed.
- WooCommerce installed and configured. At a minimum: general settings saved, at least one payment gateway enabled, and at least one product published. A checkout that processes no product is a dead end.
- FunnelKit Funnel Builder (base plugin) installed. The free version (Lite) on WordPress.org lets you build Store Checkouts, import templates, and customize checkout fields. It does not include order bumps, one-click upsells, or A/B testing, those are Pro-only features. Install the free base plugin first, then upload the Pro zip on top if you have a paid license. See the tier breakdown in the next section for the full picture.
- A page builder (optional but typical). FunnelKit works with Elementor, Divi, Gutenberg (Block Editor), Oxygen, and Bricks. You don’t need one to build a functional checkout, you can use Block Editor or shortcodes, but if you want pixel-level design control you’ll want one of these active.
- No conflicting checkout field editor plugins active. If you’re running another checkout field editor plugin, deactivate it before you build your FunnelKit checkout. Two field editors fighting over the same form produce unpredictable results.
One thing you don’t need: a developer. The entire build described in this guide is point-and-click. The judgment calls, which fields to keep, what to offer as a bump, when to go live, stay with you throughout.
Free vs. Pro: What Each Tier Actually Unlocks
Before you build anything, know exactly what your license covers. FunnelKit Funnel Builder has a free version (Lite) on WordPress.org and several paid tiers. Here’s the honest breakdown based on official FunnelKit documentation.
FunnelKit Lite (Free)
- Store Checkout creation, replace your default WooCommerce checkout page globally
- Dedicated sales-funnel checkouts
- Checkout templates (one-step, two-step, and three-step template sets)
- Custom checkout fields, add, remove, reorder, label
- Opt-in pages, sales pages, and thank-you pages
- Basic funnel builder (List mode)
FunnelKit Pro (Paid, Plus tier or higher)
- Order bumpsthe checkbox cross-sell offer on the checkout page itself
- One-click upsells and downsellspost-purchase offers accepted without re-entering payment details
- A/B split testingtest templates, copy, and offers against each other
- Full funnel analyticsper-step conversion rates, revenue, and drop-off data
- Advanced conditional fieldsfields that show or hide based on buyer selections
- Multi-step checkout layouts (Shopify-style step progression) are also a Pro feature
The practical implication: if you’re reading this guide to set up a simple Store Checkout or a dedicated funnel checkout with custom fields, Lite gets you there. The moment you want order bumps or one-click upsells, two of the highest-ROI features in the platform, you need Pro.
FunnelKit Automations is a separate plugin entirely. It handles marketing automation, abandoned cart recovery sequences, post-purchase follow-up sequences, behavior-triggered email and SMS workflows, and a built-in CRM. It has its own free version on WordPress.org and its own paid tiers. You do not need FunnelKit Automations to build a checkout. You do need it if you want automated emails or SMS triggered by customer actions, including abandoned cart recovery, order placement, form submissions, and other behavior-based events. The article section on abandoned cart recovery below flags this clearly.
Installing FunnelKit Funnel Builder
If you’re on the free version, go to Plugins → Add New in your WordPress dashboard, search “funnel builder,” and install the plugin named FunnelKit, Funnel Builder for WooCommerce Checkout. Activate it.
If you’ve purchased a Pro license, the process has two steps:
- Log in to your FunnelKit account and download both zip files, the base plugin and the Pro add-on.
- In WordPress, go to Plugins → Add New → Upload Plugin. Upload and activate the base plugin first. Then upload and activate the Pro zip. Sequence matters: Pro won’t activate without the base.
After activation, a FunnelKit item appears in your WordPress admin sidebar. That’s your command center. You won’t need to touch WooCommerce’s native checkout settings for most of what follows, FunnelKit handles it from its own menu.
Store Checkout vs. Sales-Funnel Checkout: Pick the Right One First
This is the decision most beginners skip, then wonder why their setup doesn’t match the tutorial they’re following. FunnelKit offers two distinct checkout modes, and they’re built for different traffic patterns.
Store Checkout (Global Checkout)
A Store Checkout replaces your default WooCommerce checkout page for all cart traffic. When a shopper adds anything to their cart and clicks “Proceed to Checkout,” they land on your FunnelKit Store Checkout instead of the native WooCommerce form. Think of it as a skin-and-feature upgrade for the checkout every customer hits.
You build it under FunnelKit → Store Checkout. Once you enable the toggle, it’s global, it applies store-wide. Toggle it off and WooCommerce’s default checkout comes back instantly, which makes it safe to test.
Sales-Funnel Checkout (Product-Specific / Dedicated)
A dedicated sales-funnel checkout is designed for a specific product or campaign. The buyer arrives at a landing or sales page, clicks a CTA, and lands on a checkout that already has the product waiting in it. No browsing, no cart wander. You build it under FunnelKit → Funnels.
Because the product is locked in at the funnel level, you must assign it on the checkout’s Products tab, that’s what auto-populates the cart when someone arrives via the funnel link. Skip that step and the buyer sees an empty checkout.
Which one should you build first?
If your store sells through a normal shop-browse-cart flow, customers find products, add to cart, check out, start with a Store Checkout. It improves every transaction immediately.
If you’re driving paid traffic to a specific offer (an ad, an email campaign, a launch page), build a dedicated sales-funnel checkout for that product. You can run both simultaneously, the funnel checkout overrides the Store Checkout only for traffic that enters through the funnel URL.
Building a Store Checkout Step by Step
This is the path for replacing your default WooCommerce checkout with a FunnelKit-powered global checkout. Follow these steps in order.
Step 1, Navigate to Store Checkout
In your WordPress admin, go to FunnelKit → Store Checkout. Click the Create Store Checkout button. You’ll land on the templates screen.
Step 2, Choose and import a template
Hover over any template to preview it. Templates come in one-step, two-step, and three-step formats. A two-step template includes a checkout page and a thank-you page. A three-step template adds a one-click upsell page between them, note that the upsell step requires Pro to function. Pick the number of steps you want, then click Import the Funnel.
Give your store checkout a name when prompted, then click Done. FunnelKit imports the full template set.
Step 3, Customize the checkout page design
You’ll see your funnel listed with each page as a row. Click the checkout page name to open it, then go to the Design tab. From there, click Edit Template to open your page builder. Adjust the layout, colors, logo, and any trust elements you want on the page. Save in the page builder, then return to the FunnelKit Design tab.
Step 4, Edit the checkout form fields
Still inside the Design tab, you’ll find the built-in checkout field editor below the page builder section. This is the drag-and-drop form builder where you control every field on the actual WooCommerce form, the part with billing address, email, phone, payment method, and so on. The next section of this guide covers fields in detail. For now, at minimum: remove any fields you don’t need, confirm the fields you do need are required, and click Save. For a full walkthrough of every field option, see FunnelKit Checkout Fields Customization: Add, Remove, Reorder, and Fix.
Step 5, Configure optimizations
Click the Optimization tab on the checkout page. Here you can enable Google Address Autocomplete, Express Checkout buttons (Apple Pay, Google Pay, and others if you have an accelerated gateway like Stripe configured), auto-apply coupon codes, and enhanced phone field validation. Enable what applies to your store and save.
If express checkout buttons aren’t appearing after you enable them, the issue is almost always a gateway configuration gap rather than a FunnelKit setting, see the dedicated troubleshooting guide for that: FunnelKit Express Checkout Not Showing? Every Cause and How to Fix Each.
Step 6, Customize the thank-you page
Click back to your funnel’s step list and click the thank-you page row. Edit it the same way you edited the checkout page. At minimum, confirm the order details shortcode or block is on the page so buyers see their order summary.
Step 7, Enable Store Checkout
Go back to the top-level view of your Store Checkout funnel and hit the Enable Store Checkout button. Your FunnelKit checkout is now live for all cart traffic. The default WooCommerce checkout is bypassed.
To revert at any time, toggle it off, WooCommerce’s native checkout returns immediately.
Building a Dedicated Sales-Funnel Checkout Step by Step
Use this path when you’re sending traffic from an ad, an email, or a direct link to a specific product. The checkout is part of a self-contained funnel, it doesn’t affect your store’s global checkout at all.
Step 1, Create a new funnel
Go to FunnelKit → Funnels and click Create New Funnel. On the templates screen, select Sales Funnels (as opposed to Lead Funnels) to filter the list. Preview a template you like, choose the number of steps, checkout step count included, then click Import This Template. Name the funnel and click Done.
FunnelKit imports the full step set: landing/sales page, checkout page, optional upsell page, and thank-you page, all stacked in order in the funnel view. If a template includes a one-click upsell step, that step requires Pro to function, the page will import but the upsell offer won’t fire without a Pro license.
Step 2, Customize each page
Click each step in the funnel list and edit it via the Design tab and your page builder, the same way you did for the Store Checkout. The difference here is that the landing page or sales page at the top of the funnel, the page that carries the product pitch and the CTA button, is also part of the build. The CTA button on that page needs to point to the checkout step’s URL, which FunnelKit wires up automatically when you import a template.
Step 3, Assign products to the checkout step (critical)
Click the checkout step in your funnel. Navigate to the Products tab. Click Add Productsearch for your product by name, and select it. You can set the quantity and apply a discount at this level. Click Addthen Save.
This is the step most beginners miss. Without a product assigned, the checkout loads empty. The product you assign here is what automatically populates the cart when a buyer arrives via the funnel link, they never need to manually add anything. If you’re building a funnel for a global store checkout instead, you skip this step entirely.
Step 4, Edit form fields and optimizations
The same Design-tab field editor applies here. Edit fields, add sections, configure optimizations. See the Fields section below for the full field-editing walkthrough.
Step 5, Go live
There’s no separate “enable” toggle for a dedicated funnel checkout the way there is for Store Checkout. The checkout page is a WordPress page, it goes live when the page is published. Send traffic to the funnel’s landing page URL (or directly to the checkout URL for campaigns that skip the sales page), and the funnel is live.
Editing Checkout Form Fields: The Built-In Drag-and-Drop Editor
The field editor lives inside the Design tab of any checkout page, Store Checkout or dedicated funnel checkout. When you open it for the first time on a freshly imported template, a pre-built form is already configured. That gives you a working baseline to trim and extend rather than build from zero.
The structure: sections and fields
The form is organized into sections (groups of fields, like “Contact Information” or “Shipping Address”) and fields within those sections (first name, email, phone, and so on). Sections keep the form visually organized. Payment Information, containing your WooCommerce payment gateways, is automatically pinned to the end of the form; you can’t move it above other sections.
Reordering fields and sections
Drag any field to move it within its section or across sections. Drag an entire section to reorder it relative to others. There’s nothing to unlock, just click, hold, and drop. Save when done.
Editing an existing field
Hover over any field and click to edit it. You can change the label, change the placeholder text, and toggle whether the field is required or optional. Click the trash icon to delete a field you don’t need. Click the pencil icon on a section header to rename the section.
Adding a new custom field
To add a field that doesn’t exist in the default form, a gift message, a custom order note, a delivery date picker, click Add New Field. Choose the field type from the dropdown: text, checkbox, radio, dropdown, paragraph, HTML block, password, multi-select, and more. Fill in the label and field ID, set it required or optional, and click Add. The new field appears in an Advanced section at the bottom of the form. Drag and drop it into the section where you want it to live. Click Save.
That custom field’s value is stored in order meta and is visible on the single order page in WooCommerce admin. Admins can edit it there if needed.
Adding a new section
Click Add Section at the bottom of the form. Enter the section name and an optional sub-heading, both are visible to the buyer on the checkout page. Drag the new section wherever you need it in the form order.
Multi-step forms
You can split the form across multiple steps, for example, Step 1 collects contact and shipping information, Step 2 collects payment. Click Add New Step in the field editor and move sections between steps as needed. Multi-step layouts can improve perceived simplicity for physical-product checkouts where address and payment feel like distinct tasks. Note: multi-step checkout layouts are a Pro feature, they’re not available on the free Lite tier.
One caveat
If you have any other checkout field editor plugin active at the same time, deactivate it. Two editors competing for the same form structure will produce conflicts. FunnelKit’s built-in editor is complete, you don’t need a second one.
Connecting Products to a Funnel Checkout
This section applies specifically to dedicated sales-funnel checkouts, not Store Checkouts. For a Store Checkout, WooCommerce manages the cart normally, buyers add products themselves. Product assignment on the checkout’s Products tab is only required for dedicated sales-funnel checkouts, where the product needs to auto-populate when a buyer arrives via the funnel link.
Inside the checkout step, the Products tab is where you make that assignment. Here’s what the tab lets you do:
- Add a product: Click Add Product, type the product name, select it from the dropdown, and click Add. Simple and variable products both work.
- Set quantity: You can set the default quantity at the product level right from this tab.
- Apply a discount: You can offer a percentage or flat-rate discount on the product as it appears in this funnel, useful for exclusive launch pricing without touching your main product price.
- Multiple products: You can add more than one product to the same checkout. All of them land in the cart when someone arrives via the funnel link.
One thing FunnelKit can’t do here: it can’t show a product selector that lets buyers choose which product they want at this checkout. The Products tab pre-loads a fixed set. If you need buyer-selected product variants, you handle that on the sales page above the checkout step, the CTA button can carry a pre-built cart URL for each variant, or you use WooCommerce’s own variable product selection before checkout.
Adding an Order Bump to Your Checkout (Pro Required)
An order bump is a cross-sell offer that sits on the checkout page itself, a checkbox a buyer ticks to add a complementary product to their order without leaving the checkout. It’s one of the highest-ROI additions you can make to a checkout because the buyer has already committed to paying; friction is at its lowest point.
Order bumps require FunnelKit Pro (Plus tier or higher). The free Lite version does not include this feature. If you’re on Lite and you click the checkout step, you won’t see an Add Order Bump option, you’ll need to upgrade first.
FunnelKit’s order bump system is built into both Store Checkout and dedicated funnel checkouts. Here’s how to add one once you have a Pro license active.
Step 1, Click “Add Order Bump”
In the funnel view, below the checkout step row, you’ll see an Add Order Bump button. Click it. A popup asks you to name the bump, name it something descriptive for your own reference (the buyer never sees this name). Click Add.
Step 2, Pick a skin
FunnelKit shows you a set of order bump skin templates, different visual styles for how the bump appears on the checkout page. Pick one that fits your brand and click Import.
Step 3, Add the product
You’re now inside the bump’s Products tab. Click Add Producttype the product name, and select it. You can offer simple products, variable products (with variant selection), or subscription products here. You can also set a quantity and a discount specific to the bump offer, a common pattern is to offer the bump product at a slight discount to create a sense of exclusivity.
Step 4, Design the bump content
Go to the Design tab, then the Content sub-tab. Set the bump headline and description. FunnelKit provides merge tags to pull in live data, {{product_name}} for the product name, {{product_short_description}} for the product’s short description, and {{quantity_incrementer}} if you want buyers to adjust quantity from the bump. Use the Style sub-tab to adjust colors, padding, and border to match your checkout design.
Step 5, Set display rules (optional but useful)
By default, the bump shows on every visit to that checkout page. If you want to show it only under specific conditions, for example, only when the cart total exceeds a certain amount, or only when a specific product is in the cart, click the Rules tab and configure conditions. You can stack multiple conditions with AND/OR logic.
Step 6, Save
Click Save. The bump is live on your checkout the moment you save, there’s no separate activation step for the bump itself, only for the Store Checkout toggle at the funnel level.
For a much deeper look at bump performance problems, see FunnelKit Order Bump Not Converting? 7 Causes and How to Fix Each. And for the complete order bump setup guide including design tips and advanced rules, see How to Set Up a FunnelKit Order Bump: The Complete Step-by-Step Guide.
Worked Example: A Digital Product Store Checkout with One Bump
Here’s how all the pieces connect in a realistic scenario. You sell a PDF course for $97. You want to replace your default WooCommerce checkout with a cleaner FunnelKit version and add a $27 upsell workbook as an order bump.
Note: the order bump step below requires FunnelKit Pro (Plus tier or higher). If you’re on Lite, skip Step 6, the rest of the build works without it.
- Choose Store Checkoutbecause buyers browse your shop, add the course to cart, and check out. No dedicated funnel URL needed.
- FunnelKit → Store Checkout → Create Store Checkout. Pick a two-step template (checkout + thank-you). Import it. Name it “Main Store Checkout.”
- Design tab. Open the checkout page. Click Edit Template in your page builder. Strip the header nav, add your logo and a trust badge line. Save. Return to the Design tab.
- Field editor. This is a digital product, no shipping address needed. Delete the Shipping Address section entirely. Keep: First Name, Last Name, Email, and Payment. Move Phone to optional if you don’t need it. Save.
- Optimization tab. Enable Express Checkout (if you have Stripe set up). Enable Google Address Autocomplete for the billing address. Save.
- Add Order Bump (Pro only). Below the checkout step row, click Add Order Bump. Name it “Workbook Bump.” Import a skin. Add the workbook product, set a 10% discount. In Content, write a one-line headline: “Add the companion workbook for just $24.30, exercise every concept from the course.” Save.
- Enable Store Checkout. Hit the Enable Store Checkout button. Your FunnelKit checkout is live. Place a test order to confirm the bump appears, the fields look correct, and the thank-you page shows the order summary.
The whole build takes about 30 minutes on a first run. The only thing you’re responsible for that the plugin can’t do for you: writing the bump copy that makes someone actually check the box. That judgment is yours, FunnelKit just puts the box in the right place.
Going Live: The Pre-Launch Checklist
Before you enable the Store Checkout or send traffic to a funnel URL, run through this checklist. Most of these take under a minute each to verify.
- Place a test order. Use a real (or sandbox) payment method and buy something. Confirm the order appears in WooCommerce → Orders, the confirmation email fires, and the thank-you page loads correctly.
- Test on mobile. FunnelKit templates are mobile-responsive, but your page builder customizations can introduce layout breaks on small screens. Check on an actual phone, not just a desktop browser’s mobile simulator.
- Verify the order bump appears (Pro only). If you added a bump, confirm it’s visible on the checkout page during the test order. If it doesn’t appear, check that the bump has a product assigned and that any rules you set are actually being met. The most common reason a bump is invisible is a misconfigured rule condition, see FunnelKit Order Bump Not Showing? The 9 Reasons and How to Fix Each One if it’s missing.
- Check express checkout buttons. If you enabled Apple Pay or Google Pay, test them in a supported browser (Safari for Apple Pay, Chrome for Google Pay). If they don’t appear, the gap is usually in the payment gateway configuration, not in FunnelKit. Full diagnosis: FunnelKit Express Checkout Not Showing? Every Cause and How to Fix Each.
- Confirm caching is excluded. Checkout pages must not be cached. Add your FunnelKit checkout page URLs to your caching plugin’s exclusion list. Most caching plugins exclude WooCommerce checkout automatically, but since FunnelKit generates new page URLs, double-check.
- GDPR / compliance fields. If your jurisdiction requires a privacy-policy checkbox or explicit marketing consent, confirm those fields are present and functional before going live. WooCommerce’s native GDPR features still apply, FunnelKit doesn’t create compliance issues, but it also doesn’t automatically add consent fields you haven’t configured.
- Review the page URL. For a Store Checkout, the URL is your existing WooCommerce checkout URL, FunnelKit takes it over transparently. For a dedicated funnel, copy the funnel’s checkout URL from the step row and confirm it loads cleanly before using it in ads.
One honest caveat: FunnelKit’s analytics dashboard (the funnel performance view) needs real traffic to show meaningful data. Don’t make optimization decisions based on fewer than a few hundred sessions. Build the checkout well, then let it run before you start tweaking.
After You Set Up FunnelKit Checkout: Where to Go Next
A live checkout is the foundation, it’s not the ceiling. Once you have a working Store Checkout or funnel checkout, these are the natural next moves:
- One-click upsells (Pro required). A post-purchase upsell fires after payment but before the thank-you page. Because the buyer’s payment method is already charged, they can accept the upsell with a single click, no re-entering card details. Three-step templates already include a upsell step slot; you assign a product to it and it requires Pro to function. If your upsell isn’t firing correctly, start with FunnelKit One-Click Upsell Not Working? The Reasons It Doesn’t Fire and How to Fix Each.
- Abandoned cart recovery and behavior-based automation (requires FunnelKit Automations, a separate plugin). FunnelKit Automations is a separate plugin from FunnelKit Funnel Builder, it has its own install, its own free version on WordPress.org, and its own paid license. Once installed, it can capture the buyer’s email as they type it on the checkout form, before they complete the order, and trigger an abandoned cart sequence if they leave. Beyond cart recovery, it handles automated sequences triggered by a wide range of customer actions: order placement, form submissions, post-purchase follow-ups, and other behavior-based events. FunnelKit Funnel Builder alone does not send any automated emails or SMS. If your sequences aren’t firing, see FunnelKit Abandoned Cart Emails Not Sending? Here’s How to Fix It.
- A/B testing (Pro required). Pro tier lets you split-test checkout templates against each other. Don’t run a test until you have enough volume for results to be statistically meaningful, that number varies by your traffic, but shooting for at least 200 conversions per variant is a reasonable floor.
- Analytics review. FunnelKit’s funnel performance view shows revenue, conversion rate, and per-step drop-off. Full funnel analytics require Pro. Use this to find where buyers exit, that’s where you make the next improvement.
The checkout you built today will earn it. The judgment calls you make on what to test, what to offer, and when to change things, those stay with you. The tool does the execution; you do the strategy.
FAQ
do I need FunnelKit Pro to set up a checkout?
No, the free version (Lite) is enough to set up a basic Store Checkout or dedicated funnel checkout with custom fields. What Lite does not include: order bumps, one-click upsells, A/B testing, multi-step checkout layouts, and full funnel analytics. Those are Pro-only features (Plus tier or higher). Most operators hit that wall quickly once they want order bumps, that’s the feature that drives most upgrades.
what is the difference between FunnelKit Store Checkout and a sales funnel checkout?
A Store Checkout is global, it replaces the default WooCommerce checkout for all cart traffic site-wide. A sales-funnel checkout is product-specific, buyers arrive via a direct link (from an ad or email) and the product is pre-loaded in the cart automatically. You can run both simultaneously; the dedicated funnel checkout takes over only for traffic that enters through the funnel URL.
do I need to add products to a store checkout?
No. For a Store Checkout, WooCommerce manages the cart normally, buyers add products themselves. Product assignment on the checkout’s Products tab is only required for dedicated sales-funnel checkouts, where the product needs to auto-populate when a buyer arrives via the funnel link.
can I use FunnelKit checkout with Elementor?
Yes. FunnelKit integrates with Elementor, Divi, Gutenberg (Block Editor), Oxygen, and Bricks. When you click Edit Template inside the Design tab, it opens the checkout page in whichever page builder is active on your site. The checkout form widget and order summary widget are both available natively inside Elementor and Divi.
will enabling FunnelKit Store Checkout break my existing WooCommerce checkout?
No, it replaces it, cleanly and reversibly. If you toggle off Store Checkout in FunnelKit, your site immediately reverts to the default WooCommerce checkout. No data is lost either way. That makes it safe to test before committing.
how many order bumps can I add to a single checkout?
FunnelKit Pro lets you add multiple order bumps to a single checkout page (order bumps are a Pro-only feature, not available on the free Lite tier). You can also set rules on each bump to control which one shows under which conditions, for example, show Bump A when cart total exceeds $50, show Bump B otherwise. There’s a global setting to cap the number of bumps displayed at once if you want to limit it.
does FunnelKit Funnel Builder include abandoned cart emails?
No. Abandoned cart recovery, and all other automated email and SMS sequences, is handled by FunnelKit Automations, a separate plugin with its own install and its own free and paid tiers. FunnelKit Automations handles sequences triggered by cart abandonment, order placement, form submissions, post-purchase events, and other customer behaviors. FunnelKit Funnel Builder (the checkout and funnel plugin) does not send automated emails of any kind. If you want abandoned cart sequences or any behavior-triggered automation, install FunnelKit Automations separately and configure the relevant automations there.
what should I check if my FunnelKit checkout is not loading at all?
Start with plugin conflicts. Deactivate non-essential plugins one at a time and reload the checkout URL. Caching is the next suspect: clear all cache layers (plugin, server, CDN) and try again. If the page is still blank or broken, check your browser console for JavaScript errors. A full cause-by-cause walkthrough is in FunnelKit Checkout Not Loading: Every Cause and How to Fix Each.
Sources:
Sources: FunnelKit Docs, Creating a Store Checkout; FunnelKit Docs, Create a Dedicated Sales Funnel; FunnelKit Docs, Create Steps and Sections; FunnelKit Docs, How to Create an Order Bump; FunnelKit Docs, Replace the Default WooCommerce Checkout Page; FunnelKit Docs, Funnel Builder Installation; FunnelKit Docs, Add New Custom Fields in the Checkout Form; FunnelKit, Lite vs Pro Feature Comparison; FunnelKit, Product Suite FAQ; FunnelKit Docs, Automations Installation; FunnelKit Docs, Automations Features. All documentation verified July 2026.
Brian Kasday spent forty years in direct-response marketing before rebuilding the whole operation as a one-person shop. He writes The Operator’s Library, including “The Missing Manual for FunnelKit”, for operators who’d rather build it themselves than wait on someone else.
Get the Builder’s Companion Kitthe free checklists and templates that pair with this guide: mmsvegas.com/op/funnelkit-resources/.
This guide fixes one FunnelKit step. The Missing Manual for FunnelKit covers the whole checkout system. See the manual →
More FunnelKit guides
Free · FunnelKit Operator Toolkit
Building checkouts in FunnelKit?
Get the free operator toolkit — order-bump templates, checkout checklists, and a note when what you just read changes.
Get the free toolkit →