
The 30-second answer
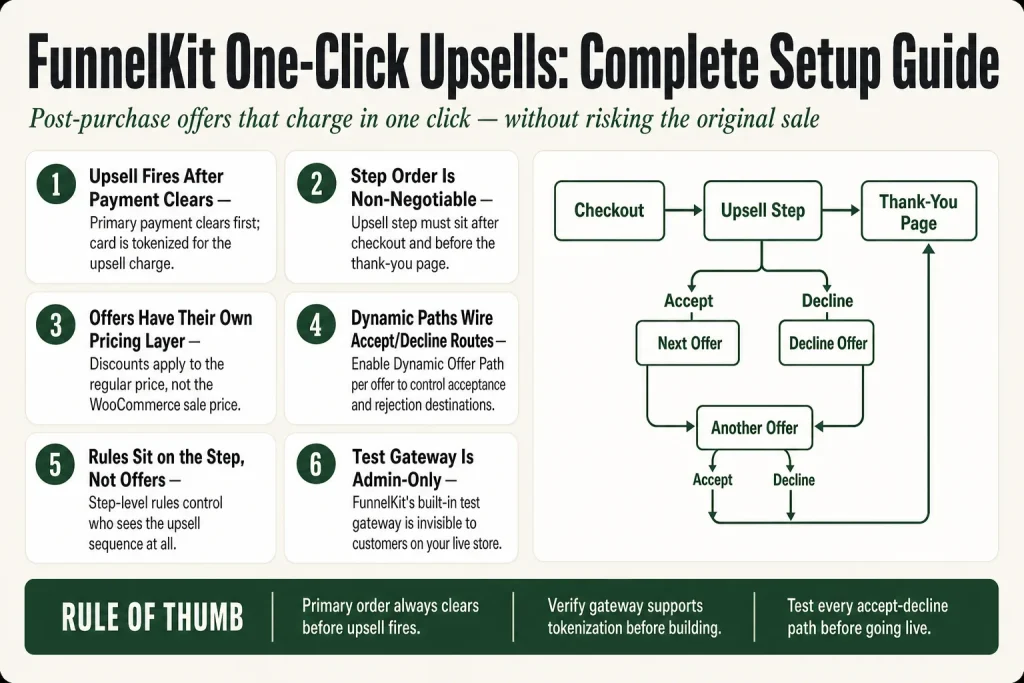
- One-click upsells are post-purchase: the offer fires after payment clears on the checkout page, before the thank-you page.
- Add the upsell step inside your funnel via Add New Step → One Click Upsells Offersplaced between checkout and thank-you.
- Inside the upsell step, go to the Products tab, click Add First Offername it, then add a product and set your discount, quantity, and flat shipping rate.
- For multi-offer funnels, enable Dynamic Offer Path per offer to pick which offer shows on acceptance and which on rejection.
- Set display rules on the upsell step (not the offer) to control who sees the sequence at all, based on order total, items purchased, gateway used, and more.
- Test without a live transaction: enable Test Gateway By FunnelKit at FunnelKit → Global Settings → One Click Upsells → Gatewaysthe gateway is admin-only and invisible to customers.
- One-click charging requires a tokenization-compatible gateway; verify your gateway supports this before launch.
Take this fix into your next scenario. The free Builder’s Companion Kit collects the checklists and templates that pair with this guide — so next time, you start from a template, not a blank page. Grab it free →
- How a One-Click Upsell Actually Fires
- Adding the Upsell Step to Your Funnel
- Building the Offer: Products, Pricing, and Discounts
- FunnelKit Upsell Setup: Wiring Accept and Decline Routing
- How Accepted Upsells Appear in WooCommerce Orders
- Rules: Controlling Who Sees the Upsell at All
- Designing the Upsell Page
- Testing the Upsell Without Placing a Live Order
- Worked Example: A Two-Offer Upsell Tree
- FAQ
FunnelKit upsell setup trips people up at three points: getting the upsell step in the right position in the funnel, wiring the accept and decline paths so customers land somewhere sensible, and confirming the whole thing fires before real orders go through. Miss any of those and you either never see the offer or you find out it was broken from a customer complaint. This guide covers all three, in order, using the FunnelKit Funnel Builder interface.
How a One-Click Upsell Actually Fires
Think of the upsell as a tollbooth between checkout and the thank-you page. The customer clicks Place Order, the primary payment clears, and then FunnelKit intercepts the redirect and shows the upsell page instead of the confirmation screen.
That sequence matters for two reasons. First, the initial sale is never at risk: the payment for the primary order is deducted right away, then the card is tokenized for the upsell charge. If the customer declines, they still completed the original order. Second, the upsell can charge with a single click because the gateway has already stored a payment token; the customer never re-enters card details.
The practical constraint: some gateways, particularly those that trigger 3D Secure on every charge, can break that one-click flow. Verify your gateway supports card tokenization before you build anything. FunnelKit maintains a compatibility list in its documentation; Stripe via the FunnelKit Stripe plugin has the deepest integration.
One-click upsells are a paid feature. FunnelKit Funnel Builder Pro is required; the free Lite version does not include them.
Adding the Upsell Step to Your Funnel
Open your funnel in FunnelKit → Funnels. If you are starting from a template, a funnel imported from the template library will often already include a upsell step and a thank-you page. If you are building from scratch or adding to an existing funnel:
- Click Add New Step inside the funnel canvas.
- Select One Click Upsells Offers from the step-type options.
- Choose a template or import a blank one, give the step a name, and confirm.
- Drag the step so it sits after your checkout and before your thank-you page. FunnelKit will not fire the upsell if the step order is wrong.
Once the step exists, click its name to open the upsell editor. You will see tabs for Design, Products, and Settings. Products is where you build the actual offers.
Building the Offer: Products, Pricing, and Discounts
Inside the Products tab you are building an offer, not just picking a product. An offer is a named deal that can hold one or more products with its own pricing layer on top.
- Click Add First Offer (or Add New Offer for subsequent ones). Give it an internal name you will recognize in the offer tree.
- Click Add Product, type the product name, and select it from the dropdown. The product is added to the offer.
- Set the discount, quantity, and flat shipping rate at the offer level. These override the standard product price on the upsell page. Discounts apply to the product’s regular price in WooCommerce, not the sale price.
- To offer multiple products on one upsell page, click Add Product again. You can display them in list or grid format.
For pricing math: FunnelKit takes the product’s regular price, multiplies by quantity, applies your offer discount, adds flat-rate shipping if set, then adds applicable taxes. That final number is the Offer Price the customer sees and pays.
Variable products work too. Add a variable product, check the specific variants you want available, and optionally set a default variant that pre-selects when the offer loads. Discounts can apply across all variants or per variant individually.
If you are using WooCommerce Subscriptions as the upsell product, you will see extra fields: Subscription Discount (applies the discount to all future renewals), Sign-Up Fee Discount, and Override Free Trial. Check the FunnelKit subscriptions integration guide before using these on live funnels; the interaction with renewal billing needs testing.
FunnelKit Upsell Setup: Wiring Accept and Decline Routing
With a single offer, routing is automatic: accept goes to the thank-you page, decline goes to the thank-you page. No configuration needed.
With two or more offers, you need Dynamic Offer Paths to tell FunnelKit where each decision leads. Without it, every customer just falls through to the thank-you page regardless of what they did.
Enabling Dynamic Offer Path
- In the Products tab, find the offer you want to configure and open its settings area.
- Check the Dynamic Offer Path box.
- Two dropdowns appear. Use the first to pick which offer shows on acceptance; use the second to pick which offer shows on rejection.
- Hit Save.
Repeat this for each offer in the tree. You are essentially drawing a flowchart. A common pattern: Offer A (high-ticket) → accepted goes to thank-you, rejected shows Offer B (lower-ticket downsell). Whether Offer B is accepted or rejected, the customer then goes to thank-you.
One constraint worth knowing: a downsell offer cannot branch into its own independent upsell/downsell chain. The tree terminates from the downsell level.
You can also set any offer path to terminate the funnel immediately and send the customer to the thank-you page, which is useful when you do not want a third offer shown to someone who already declined twice.
If a customer declines the upsell and you want to follow up later, FunnelKit Automations can trigger on the Offer Rejected event. See the sibling article on automation triggers if that follow-up sequence is not firing as expected.
How Accepted Upsells Appear in WooCommerce Orders
By default, an accepted upsell is added to the original order. The customer sees one order on the thank-you page; you see one order in WooCommerce with the upsell item included.
You can change this in the upsell step’s Settings tab, under the Order section:
- Create a new order: each accepted upsell becomes a separate WooCommerce order. The thank-you page will show both order details side by side.
- Cancel Main Order: set this to Yes alongside Create a new order if you want the upsell order to replace the original rather than sit alongside it. Use this for upgrade-style offers where the upsell is a superset of the primary product.
Both options have automation and fulfillment implications. If your warehouse or email system triggers off a specific order status, test whether it handles two orders or a cancelled-then-replaced order the way you expect before going live.
Rules: Controlling Who Sees the Upsell at All
Rules live on the upsell step, not on individual offers. They decide whether the entire upsell sequence fires for a given customer. Offer-level settings decide what gets shown inside the sequence once it fires.
To add rules, click on the upsell step name in your funnel canvas, then click Add Rules. You can filter by:
- Order total (greater than, less than, equals)
- Items purchased (product, category)
- Payment gateway used
- Coupon code used
Multiple conditions within a rule group act as AND logic. Multiple rule groups act as OR logic: the upsell fires if any one group is fully met.
If you are showing different offers to different customer segments, the FunnelKit rule engine deep-dive covers every available condition and how to combine them without creating conflicts.
Designing the Upsell Page
The upsell page template is edited from the Design tab. FunnelKit has a deep integration with Elementor, Divi, Gutenberg, and Oxygen. Each comes with dedicated upsell widgets you drag and drop onto the page: Accept button, Reject button, Accept Link, Reject Link, Offer Price, Product Image, and others.
The Accept and Reject controls are not regular links. They carry special values that FunnelKit reads to route the customer and trigger or skip the charge. If you are building a custom page with a page builder that uses button links rather than widgets, the documentation for that builder will show you the specific shortcode or link value to use.
One design note that affects money: make sure the Accept button is above the fold on mobile. A customer who has to scroll to find the buy button is a customer who bounces. Test on a real phone, not a browser emulator.
Testing the Upsell Without Placing a Live Order
FunnelKit ships a built-in test gateway specifically for this. It creates a real WooCommerce order with no actual payment processed, and it is visible only to administrators. Customers on your live store never see it.
Enabling the Test Gateway
- Go to FunnelKit → Global Settings → One Click Upsells.
- Under Gateways, enable Test Gateway By FunnelKit and save.
Running a Test
- Open your storefront as the admin user (not in an incognito window logged out).
- Add a product to cart and go through the checkout. Select the Test Gateway as the payment method.
- Click Place Order. The upsell page should appear.
- Accept the offer and confirm the thank-you page shows the correct order details.
- Repeat the checkout but decline the offer this time. Confirm you land on the right next step in your offer path.
If you have a multi-offer tree, test every path: accept-then-accept, accept-then-decline, decline-then-accept, decline-then-decline. Each branch is a separate test run.
An alternative for testing on a live store without touching real customers is the hidden-funnel method: create a hidden WooCommerce product (visibility set to Hidden), build a separate test funnel that only fires when that hidden product is in the cart (via a rule), and use that funnel to test freely without the upsell ever showing to real shoppers.
The Test Gateway tells you whether the funnel mechanics work. It does not tell you whether your live payment gateway will tokenize and charge successfully. Before going live, run one real small-amount transaction with your actual gateway in its own test/sandbox mode to confirm tokenization is working. A one-click upsell that silently fails at the charge step is invisible: the main order succeeds, so nothing looks broken from the outside.
If the upsell page is not appearing at all during testing, the most common causes are a missing product on the offer, the step order being wrong in the funnel canvas, or a rule that the test order does not meet. See the companion article on FunnelKit one-click upsell not working for a full checklist.
Worked Example: A Two-Offer Upsell Tree
Say you sell a $49 online course. You want to offer a $79 coaching bundle immediately after purchase. If they decline, you want to offer just a $29 PDF workbook as a fallback.
Here is the full setup from scratch:
- Funnel structure: Checkout step → Upsell step → Thank-you step.
- Upsell step, Products tab: Click Add First Offer, name it Coaching Bundle. Add the coaching bundle product. Set discount if you want to offer it below the regular product price.
- Add second offer: Click Add New Offer, name it Workbook. Add the workbook product.
- Wire the paths: On the Coaching Bundle offer, enable Dynamic Offer Path. Set on acceptance to go to Thank-You. Set on rejection to show the Workbook offer.
- Wire the second offer: On the Workbook offer, you can leave Dynamic Offer Path off if both outcomes go to the thank-you page. Or enable it and set both dropdowns to Thank-You explicitly.
- Rules: Click the upsell step name, click Add Rules. Set a rule so the upsell only fires when the purchased product is your $49 course. This prevents the upsell from showing on unrelated purchases.
- Test: Enable the Test Gateway. Place a test order with the $49 course. Confirm the coaching bundle appears. Decline it. Confirm the workbook appears. Decline that too. Confirm the thank-you page loads. Then repeat, accepting the coaching bundle, and confirm the workbook never appears.
For order bumps on the checkout page before this upsell sequence, the setup process is similar but different enough that it has its own guide: setting up a FunnelKit order bump. The two features complement each other but are configured separately.
FAQ
Does FunnelKit one-click upsell work with any payment gateway?
No. The one-click upsell requires card tokenization, which not every gateway supports. FunnelKit has a documented compatibility list. The FunnelKit Stripe plugin has the deepest integration. If you use a third-party or unofficial gateway plugin, check with that gateway’s support team whether tokenization is available before building your upsell funnel.
Can I add a one-click upsell without FunnelKit Pro?
No. One-click post-purchase upsells are a paid feature and require FunnelKit Funnel Builder Pro. The free Lite version does not include the upsell step type.
What happens if someone declines every upsell offer?
They land on the thank-you page and their original order is unaffected. The initial payment clears before the upsell ever appears, so declining any or all offers never touches the primary sale.
How do I test the upsell without charging real cards?
Enable the Test Gateway By FunnelKit at FunnelKit > Global Settings > One Click Upsells > Gateways. It is visible only to administrators. Place a test order using that gateway and walk through every accept and decline path in your offer tree. For final pre-launch verification, also run one real small-amount transaction using your live gateway in sandbox mode to confirm tokenization works.
What is the difference between an upsell step and an offer?
The upsell step is the funnel position, and it holds the display rules that control whether the whole sequence fires. An offer is the individual deal inside that step, with its own product, pricing, and dynamic path settings. One upsell step can contain multiple offers branching on accept/decline decisions.
Can I A/B test my upsell offer page?
Yes, FunnelKit has A/B testing built into the funnel editor for upsell steps. You can split-test different page designs or offer presentations. The A/B testing feature is available on higher-tier plans.
Sources:
Sources: FunnelKit Docs: Creating Your First Upsell; FunnelKit Docs: How to Add a New Offer; FunnelKit Docs: Offer Settings; FunnelKit Docs: Offer Pricing; FunnelKit Docs: Supported Product Types; FunnelKit Docs: One Click Upsell Rules; FunnelKit Docs: How to Test Upsells; FunnelKit Docs: Hidden Funnel Testing; FunnelKit Docs: Create a New Order When Upsell is Accepted; FunnelKit Docs: Cancel and Replace Primary Order; FunnelKit Docs: Payment Gateway Compatibility; FunnelKit Docs: Add Post-Purchase One Click Upsells.
Brian Kasday spent forty years in direct-response marketing before rebuilding the whole operation as a one-person shop. He writes The Operator’s Library — including “The Missing Manual for FunnelKit” — for operators who’d rather build it themselves than wait on someone else.
Get the Builder’s Companion Kit — the free checklists and templates that pair with this guide: mmsvegas.com/op/funnelkit-resources/.
This guide fixes one FunnelKit step. The Missing Manual for FunnelKit covers the whole checkout system. See the manual →
More FunnelKit guides
Free · FunnelKit Operator Toolkit
Building checkouts in FunnelKit?
Get the free operator toolkit — order-bump templates, checkout checklists, and a note when what you just read changes.
Get the free toolkit →