
Last updated: July 2026
- The 30-second answer
- Cause 1: The Offer Isn’t Relevant to What’s in the Cart
- Cause 2: The Price Is Too High for an Impulse Decision
- Cause 3: The Copy Doesn’t Make the Case
- Cause 4: The Bump Is Positioned Where Eyes Don’t Land
- Cause 5: The Bump Design Blends Into the Page
- Cause 6: Multiple Bumps Are Competing or Misfiring
- Cause 7: Your FunnelKit Order Bump Isn’t Converting Because You’re Optimizing Blind, No Data, No Tests
- FAQ
Your FunnelKit order bump is showing up on the checkout page. Customers are seeing it. And almost nobody is clicking it. That’s the frustrating version of this problem, the bump displays fine, but it doesn’t convert. If your bump is invisible, that’s a different diagnosis (see FunnelKit Order Bump Not Showing). This article is for the bump that’s live but dead in the water.
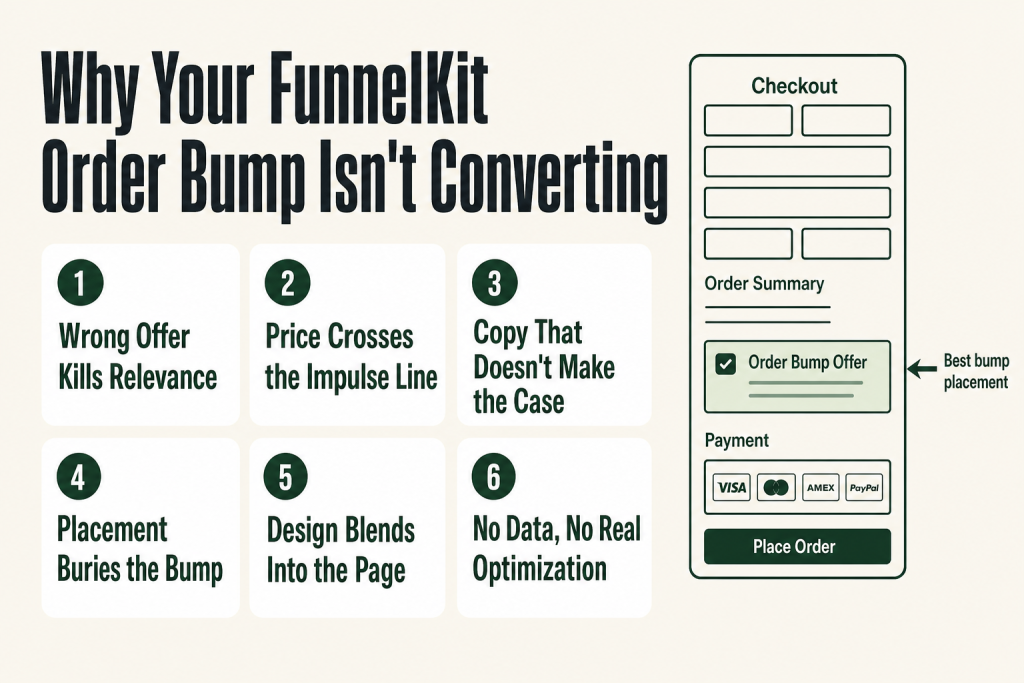
A FunnelKit order bump not converting almost always comes down to one of seven causes: the offer itself isn’t relevant, the price is wrong, the copy fails to make the case, the position buries it, the design blends into the page, no social proof softens the ask, or you’re running blind without data. Each has a specific fix inside FunnelKit. Work through them in order, you’ll find the culprit.
The 30-second answer
- Wrong offer: The bump product doesn’t complement what’s in the cart, rule targeting can fix this.
- Price mismatch: Friction rises sharply when the bump costs more than the impulse threshold, use a bump-level discount.
- Weak copy: Generic title + placeholder description = ignored, rewrite using the Content tab with specific benefit language.
- Bad placement: Buried below the fold or inside the mini cart where eyes don’t land, test positions above the payment gateways.
- Design blends in: The bump box looks like background noise, adjust border, background color, and CTA text in the Style tab.
- No social proof: The social proof tooltip feature exists and most operators leave it off, enable it.
- No data: You’re guessing. FunnelKit’s built-in analytics and A/B testing show you exactly what to change.
Cause 1: The Offer Isn’t Relevant to What’s in the Cart
This is the most common culprit. An order bump isn’t a sidebar ad, it’s supposed to feel like a natural extension of the purchase already in progress. When someone buying a yoga mat sees a bump for a dog toy, they don’t just ignore it. They mentally disconnect from the whole checkout flow.
The fix is targeting rules. FunnelKit lets you set conditions that control when a bump appears, by cart items, cart total, product category, customer location, purchase history, and more. You can even combine conditions using AND/OR logic so a bump only fires when every condition is met.
A practical example: you sell a skincare serum. Your bump should be a complementary product, a lip balm, a toner, a travel bag, not a random SKU. Use Cart Items → Contains as your rule trigger, select the serum, and point the bump at the companion product. Shoppers who see that feel like you read their mind. Shoppers who see an unrelated offer feel like they’re being sold at.
If you’re running one catch-all bump with no rules, you’re showing the same offer to everyone regardless of what’s in their cart. That’s the checkout equivalent of handing every customer the same flyer. Some will take it; most won’t.
Check your rules under the Rules tab of your order bump. If it’s set to No Rules (which means it always shows), create at least one cart-based condition that ties the bump product to the primary purchase. If you haven’t built the bump yet, the FunnelKit order bump setup guide walks through the full configuration from scratch.
Cause 2: The Price Is Too High for an Impulse Decision
An order bump lives at the moment of maximum buying energy, but it also lives at the moment of maximum financial anxiety. The customer is about to hand over money. A bump that asks for another $97 on top of a $49 order creates resistance, not excitement.
Order bumps work best when the math feels obvious. The customer shouldn’t need to deliberate. If they’re stalling, the price is too high relative to the perceived value, or relative to the main order total.
FunnelKit lets you set a bump-level discount in the Products taba percentage off or a fixed-price drop that’s exclusive to the bump and doesn’t appear on the product’s own page anywhere else on your site. That exclusivity is part of the pitch: the customer gets this price only here, only now. Use that framing in your copy.
A rough mental model: your bump price should feel like rounding up, not like a second purchase. On a $50 order, a $10, $20 bump feels additive. A $60 bump feels like a separate buying decision, and those get deferred or declined.
If you’re not sure where your threshold sits, that’s exactly what A/B testing is for. Run your current price against a lower one for two weeks and let the data tell you.
Cause 3: The Copy Doesn’t Make the Case
The default bump copy that ships with most skins is a placeholder. If you haven’t rewritten it, you’re essentially asking customers to add something to their cart based on a product name and a price. That’s not enough.
The bump has seconds, not minutes, to land. Your headline needs to state a specific benefit, not the product name. “Protect your skin between sessions” beats “Hydrating Face Mist” every time. The description needs to answer the one question in the customer’s head: why do I need this right now?
FunnelKit’s Content tab (inside the bump’s Design section) is where you write the title and description. You can use merge tags to dynamically pull in product name, price, subscription details, and savings amounts, so the copy stays accurate even if you change pricing later. The {{product_short_description}} tag pulls the WooCommerce product short description directly; if that description is already strong, it’s a fast win.
Two copy mistakes that kill conversion rate:
- Restating the product name as the headline. The name is already visible. Use the headline for a benefit statement.
- Vague urgency. “Limited time offer!” without any specific framing is noise. If the discount genuinely disappears after checkout, say that plainly. If it doesn’t, don’t claim it does, customers who feel manipulated don’t come back.
Rewrite the headline and description in the Content tab, save, then do a real test checkout on a desktop and a phone before you publish.
Building this yourself? The free Builder’s Companion Kit collects the checklists and templates that go with this guide, grab it at mmsvegas.com/op/funnelkit-resources/.
Cause 4: The Bump Is Positioned Where Eyes Don’t Land
Even a perfect offer with sharp copy can die if it’s positioned somewhere customers scroll past. Placement is a conversion lever most operators set once and never revisit.
FunnelKit supports multiple placement options, above the payment gateways, below the payment gateways, inside the mini cart, above the mini cart, below the mini cart, and on the checkout form itself. You can also set a separate position for mobile, which matters because mobile layout is fundamentally different from desktop.
Above the payment gateways tends to get strong results because it sits right at the moment of decision, the customer is about to click Pay and the bump is literally in their path. Inside the mini cart can work for impulse items, but it’s easy to miss on smaller screens.
To change position: go to your order bump → Design → Style tab → find the Position in Desktop setting (and Position in Mobile directly below it). Adjust both independently. Save and test on both screen sizes.
Don’t assume one position is universally best. FunnelKit’s A/B testing lets you split-test placements head to head. Run two variants, one above the payment gateways, one inside the mini cart, split traffic 50/50, and let a few hundred sessions tell you which spot actually moves the needle on your specific checkout page.
If you want a deeper look at how to build out a bump from scratch before you optimize it, the FunnelKit order bump setup guide covers the full process.
Cause 5: The Bump Design Blends Into the Page
A bump that looks like part of the page furniture gets treated like part of the page furniture, ignored. If the background color matches your checkout form, if the border is invisible, if the CTA text is the same weight as every other text element, shoppers’ eyes slide right over it.
The bump needs to look distinct without looking out of place. A contrasting background color, even a subtle one, signals to the eye that this is a separate, clickable unit. A visible border helps. A CTA button or checkbox with a color that stands out from the rest of the form completes the effect.
Everything visual lives in the Style tab: background color, border style and color, CTA text color and size, image border, description text, price display, and the exclusive offer text block. You can also toggle the product image on or off, images consistently outperform text-only bumps for physical products.
One thing worth enabling if you haven’t: the Social Proof Tool Tip. When a customer hovers over the “Add to My Order” button, checkbox, or toggle, a small tooltip appears with a custom heading and message you write, things like savings amounts, short testimonials, or a reminder of what they’re getting. It’s a micro-persuasion moment at exactly the right time. Enable it under the Style tab → Social Proof Tool Tip section.
After every design change, do a fresh test checkout on mobile. Mobile layout compresses elements and what looks bold on desktop can become a thin strip on a phone.
Cause 6: Multiple Bumps Are Competing or Misfiring
Running multiple order bumps on one checkout page is powerful, but it introduces a sequencing problem. If you have three bumps and two of them match the cart conditions, you might be showing the wrong one first, or overwhelming the customer with choices.
FunnelKit’s global settings let you cap the maximum number of order bumps displayed at checkout. If you have multiple bumps configured, you can also set a priority on each one so FunnelKit knows which to show when conditions overlap.
The sequencing rule: lead with your most relevant, lowest-friction bump. If a customer declines it, the next bump showing doesn’t help, but having the right one first maximizes the chance at least one lands.
Check your bump priorities under each bump’s Settings tab. Review your rules to make sure you’re not accidentally showing a mismatch because two bumps both qualify for the same cart. A bump for coffee should only show when there’s coffee gear in the cart, not when the rule is set too broadly and fires for any cart over $20.
Also worth auditing: the Replace cart item setting in the Products tab. This is designed for subscription upgrades, it swaps the bump product for an existing cart item rather than adding to it. If that’s enabled on a bump that isn’t a subscription upgrade, the customer may be confused about what’s happening to their original order.
Cause 7: Your FunnelKit Order Bump Isn’t Converting Because You’re Optimizing Blind, No Data, No Tests
If you’re changing copy, price, and position based on gut feel, you’re playing a guessing game. FunnelKit gives you the instruments to stop guessing.
The analytics dashboard tracks views, clicks, conversions, conversion rate, and revenue for each bump individually. To find your conversion rate, go to the Analytics tabscroll down to see the per-bump breakdown including orders, conversions, and revenue. That number is your baseline. If it’s under 10%, one of the causes above is the problem. If it’s above 30%, your bump is healthy and you might have headroom to test a higher price.
The built-in A/B testing feature lets you pit two versions of a bump against each other, different products, different copy, different discounts, different placements. You split traffic by any percentage you want (50/50, 60/40, whatever fits your volume). FunnelKit tracks both variants and shows you conversion rate side by side. When you have enough data, declare a winner and that variant takes 100% of traffic going forward.
One practical note from the docs: exclude your checkout pages from your caching plugin when running A/B tests, or visitors can get served a cached version of one variant regardless of the split setting, which corrupts your data.
The judgment call on when to declare a winner is yours. Don’t pull the plug after 20 sessions. Wait until each variant has seen enough traffic to produce a meaningful difference, the exact number depends on your traffic volume, but as a starting point, aim for at least 100 completed checkouts per variant before reading the results as conclusive.
For context on how FunnelKit’s upsell analytics connect to the broader funnel, the one-click upsell troubleshooting guide covers the post-purchase side of the same revenue equation. If your checkout page itself is misbehaving while you run these tests, FunnelKit Checkout Not Loading covers every cause of that separately.
FAQ
what is a good conversion rate for a funnelkit order bump
A well-configured order bump typically converts somewhere between 10% and 40% of checkout visitors depending on the product, price point, and how tightly the offer matches the cart. If you’re under 10%, one of the seven causes in this article is almost certainly the problem. FunnelKit’s Analytics tab shows your exact conversion rate per bump, check it before making any changes.
can I show different order bumps to different customers in funnelkit
Yes. FunnelKit’s rule engine lets you target bumps by cart items, cart total, product category, customer location, purchase history, user role, date, time, and more. You can combine conditions with AND/OR logic so each bump fires only for the right buyer. This is the primary tool for improving offer relevance.
does the funnelkit order bump pre-select option hurt or help conversions
It depends on your audience and your offer. Pre-selecting the bump means it’s already added when the customer arrives at checkout, they’d have to actively uncheck it to remove it. This can lift accepted-bump numbers but may also increase friction or chargebacks if customers feel surprised. Test it as an A/B variable before making it your default. The setting lives in the Style tab under “Pre-Select Order Bump by Default.”
how do I A/B test an order bump in funnelkit
FunnelKit’s built-in A/B testing covers order bumps. Set up a variant bump (different product, copy, price, or placement), assign traffic weights (such as 50/50), and publish the test. The Analytics tab tracks views, conversions, conversion rate, and revenue for each variant side by side. When you have enough data, declare a winner, FunnelKit sends 100% of traffic to the winning variant. Important: exclude your checkout pages from your caching plugin while the test runs.
should I use a discount on my order bump
A bump-level discount is often the fastest conversion lever to pull, especially when your bump price is close to your main product price. The discount set in FunnelKit’s Products tab applies only at the bump, it doesn’t appear on the product’s regular page. Make that exclusivity part of your copy: the customer gets this price only here, only now. For subscription products, make sure your bump copy clearly states the recurring billing terms.
what is the social proof tooltip in funnelkit order bumps
It’s a small tooltip (labeled “Social Proof Tool Tip” in FunnelKit’s UI) that appears when a customer hovers over the order bump’s accept button, checkbox, or toggle. You set the heading and message inside the Style tab, typically a short testimonial, a savings reminder, or a quick benefit statement. It’s a micro-persuasion moment at exactly the right spot in the checkout flow and most operators leave it unused.
why does my funnelkit order bump show but never get accepted
The bump displaying and not converting are two separate problems. The most common causes, covered in this article, are offer mismatch (the bump product doesn’t relate to what’s in the cart), price friction (the bump costs too much relative to the main order), and weak copy (the headline restates the product name instead of a benefit). Start with offer relevance: check your Rules tab and make sure the bump only fires for carts that logically pair with the bump product. Then check your Analytics tab to see exactly how many views the bump is getting versus how many acceptances, that ratio tells you how deep the problem runs.
Sources:
Research for this article drew on FunnelKit’s official documentation: Order Bumps OverviewRules (Order Bump)Products (Order Bumps)Style (Order Bump)Content (Order Bump)Set the Display Position of Order BumpsGlobal Settings (Order Bump)A/B ExperimentsGetting Started with Integrated A/B Testingand the FunnelKit Funnel Builder 3.9 release notes (new order bump positions) and 3.11 release notes (social proof tooltip). All UI labels and feature availability verified against live documentation as of July 2026.
Brian Kasday spent forty years in direct-response marketing before rebuilding the whole operation as a one-person shop. He writes The Operator’s Library, including “The Missing Manual for FunnelKit”, for operators who’d rather build it themselves than wait on someone else.
Get the Builder’s Companion Kitthe free checklists and templates that pair with this guide: mmsvegas.com/op/funnelkit-resources/.
More FunnelKit guides
Free · FunnelKit Operator Toolkit
Building checkouts in FunnelKit?
Get the free operator toolkit — order-bump templates, checkout checklists, and a note when what you just read changes.
Get the free toolkit →