
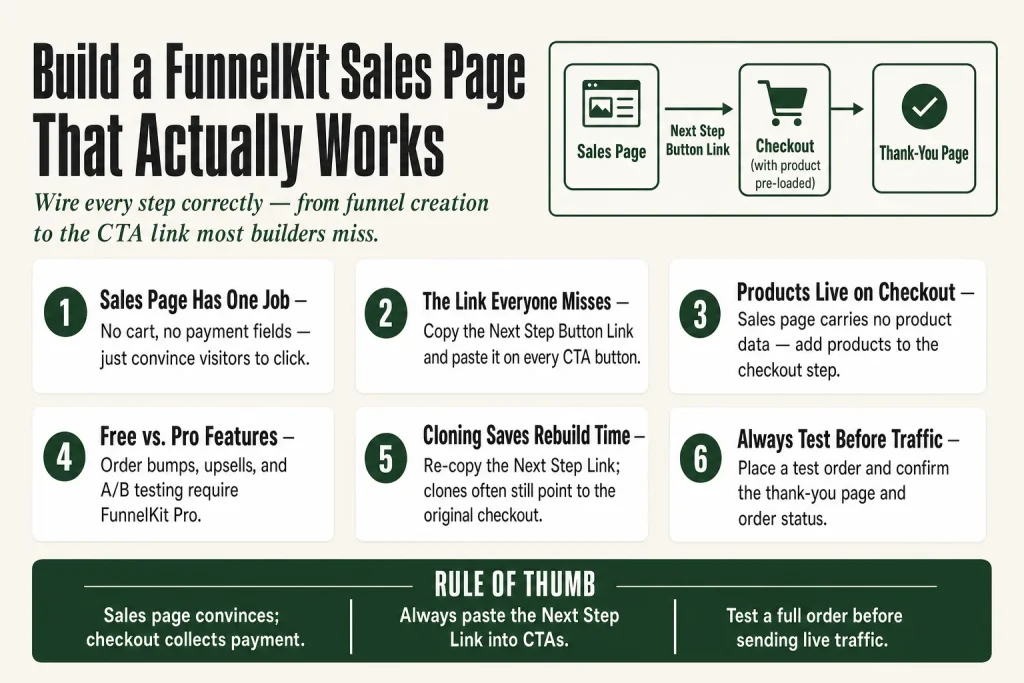
The 30-second answer
- Go to FunnelKit → Funnels → Add New Funnel, choose a Sales Funnel template (or Start from Scratch), name it, and click Done.
- Click the sales page step in your funnel list to open it, then pick your page builder and import a template (or a blank canvas).
- Open the template in your page builder and edit copy, images, colors, and your offer.
- Back in the FunnelKit step panel, go to the Design tab and copy the Next Step Button Link.
- Paste that link onto every CTA button on your page, save, and publish.
- Add a checkout step (and optionally an order bump or upsell, both require FunnelKit Pro) after the sales page so the link has a destination.
- Preview the full flow and place a test order before sending traffic.
Take this fix into your next scenario. The free Builder’s Companion Kit collects the checklists and templates that pair with this guide — so next time, you start from a template, not a blank page. Grab it free →
- What the Sales Page Step Actually Does
- Step 1: Create the Funnel and Add the Sales Page Step
- Step 2: Pick a Template and Open It in Your Page Builder
- Step 3: Edit the Page in Your Builder
- Step 4: Copy the Next Step Button Link and Wire Your CTAs
- Step 5: Add Products to the Checkout Step
- Optional: Order Bumps, Upsells, and What Comes After the Sales Page
- Worked Example: A Simple Three-Step FunnelKit Sales Page Funnel
- Global Settings for Sales Pages: CSS and External Scripts
- Cloning a Sales Page You Already Built
- Checking Stats on the Sales Page Step
- FAQ
A FunnelKit sales page is the opening act of a dedicated product funnel: visitors land here, read your pitch, and click a button that drops them straight into checkout. Skip it or wire it wrong, and your paid traffic bounces to a generic WooCommerce product page and probably leaves. This guide walks every step, from creating the funnel to copying the next step button link that makes the CTA actually go somewhere.
What the Sales Page Step Actually Does
FunnelKit splits “sales page” and “checkout” into separate steps on purpose. The sales page is a plain WordPress page inside your funnel. It has no cart, no payment fields, no WooCommerce form at all. Its only job is to convince someone to click a button.
When they click, FunnelKit routes them to the next step in the funnel, which is almost always a checkout page with the product already pre-loaded in the cart. That pre-load happens because the checkout step holds the product configuration, not the sales page. The sales page just carries the link that sends the visitor there.
That separation matters for two reasons. First, you can A/B test your pitch page without touching your checkout (A/B testing is a Pro-only feature, not available on the free version). Second, your checkout URL stays clean because traffic arrives with a fixed product already in the cart rather than from a Shopify-style “add to cart” flow.
Quick note on terminology: in FunnelKit, a sales funnel is the broader structure, a sequence of steps (sales page, checkout, upsell, thank-you) built around a single offer. A sales page is specifically the opening step in that funnel. The two terms are related but not interchangeable: every sales page lives inside a sales funnel, but a sales funnel contains much more than just the sales page.
If you are selling through your main storefront (product pages, the default WooCommerce cart), you want a Store Checkout instead. The dedicated sales page funnel is for single-product or single-offer campaigns where you control every page a visitor sees. See FunnelKit Store Checkout vs Product-Specific Checkout if you are unsure which fits your situation.
Step 1: Create the Funnel and Add the Sales Page Step
Go to FunnelKit → Funnels and click Add New Funnel (or Create New Funnel depending on your version). You land on the template library.
At the top of the library, filter by Sales Funnels. FunnelKit shows templates that already include a sales page, checkout, and thank-you page bundled together. Pick one, preview it, then click Import This Template, give the funnel a name, and click Done. FunnelKit creates all three (or four, if the template includes a one-click upsell) steps at once. Note: one-click upsell steps in a template will only be functional if you are on FunnelKit Pro.
If you would rather build from scratch: on the template screen, choose Start from Scratch. FunnelKit lets you pick which step types to include. Select Sales Page (plus Checkout and Thank You at minimum), name the funnel, and click Done. The funnel appears in List mode with each step shown as a row you can click into.
Canvas mode note: Canvas mode is a Pro-only feature. It shows the same steps as a visual flowchart, and also surfaces per-step analytics and conditional branching (the “if accepted / if declined” logic for upsells) directly on the canvas. The free version (Lite) uses List mode only. You can add a sales page step in Canvas mode by clicking the + node and selecting Sales. Everything else in this guide applies equally to both modes.
Step 2: Pick a Template and Open It in Your Page Builder
Click the sales page step name in your funnel. This opens the step panel inside FunnelKit, landing on the Design tab.
If you imported a full funnel template, the design is already there and you will see an Edit [Builder] Template button. Click it and jump straight to the next section.
If you are on a blank step, the Design tab shows the template picker. You will see a page-builder selector at the top. FunnelKit integrates directly with Elementor, Divi, Gutenberg, and Oxygen. If you use a different builder, pick Other and you will get shortcode-compatible blank output.
Once you pick a builder, you can browse pre-made sales page designs. Click any thumbnail to preview the full page. When you find one that is close to what you need, click Import This Template, give the page a name, and click Add. FunnelKit imports the design and returns you to the Design tab.
To start from a completely blank canvas in Elementor, choose Start from Blank rather than picking a template. This imports an empty Elementor page so you can build from zero.
Step 3: Edit the Page in Your Builder
Back on the Design tab, click the Edit [Builder] Template button. The page opens in your chosen editor.
What you edit here is a standard WordPress page, so every tool your builder normally gives you is available. Work through the typical sections of a sales page:
- Headline and sub-headline: Your clearest statement of what the product does and who it is for.
- Body copy: Problem, solution, proof. Keep it scannable with short paragraphs, bullets, and bold callouts.
- Social proof: Testimonials, case study snippets, review screenshots. FunnelKit does not add these automatically; you place them as page builder elements.
- Call-to-action buttons: Every CTA button on this page needs the next step button link (explained in Step 4 below). Placeholder text like “Buy Now” or “Get Instant Access” works fine for now. You will wire the actual link after saving.
- Visual elements: Product images, demo video embeds, feature comparison tables. All standard page builder territory.
When you are satisfied, click Update (Elementor) or the equivalent save button in your builder. Then close the builder tab and return to FunnelKit.
Step 4: Copy the Next Step Button Link and Wire Your CTAs
This is the step people most often miss, and it is the one that makes the sales page actually function inside the funnel.
On the Design tab of your sales page step, look for the field labeled Next Step Button Link. That label is confirmed in the official FunnelKit documentation and in the Sales Pages FAQ. Copy the URL from that field.
The key advantage of this link is that it always points to whatever comes next in the funnel, regardless of what that page’s actual URL is. Think of it like a baton pass: even if you later rearrange your funnel steps or rename a page, the link stays valid because FunnelKit resolves the destination dynamically.
Now go back into your page builder (click Edit Template again) and paste that URL into the link field of every CTA button on the page. Save again.
If a CTA button already has the next step button link pre-wired (this happens on some full-funnel templates, since FunnelKit pre-sets it on template CTAs), verify it rather than assuming it is correct. The link should start with your site domain and contain a FunnelKit-generated path, not a hardcoded product or cart URL.
Step 5: Add Products to the Checkout Step
The sales page carries no product data. Products live on the checkout step in the funnel. Click the checkout step in your funnel, go to its Products tab, and add the product(s) that should land in the cart when a visitor clicks through from the sales page.
When a visitor clicks the CTA on your sales page and arrives at the checkout, those products are automatically added to their cart. They skip the standard WooCommerce add-to-cart flow entirely, which is the point. The checkout page pre-fills their cart and asks them to pay.
If you are selling a variable product (one with size or color options), there is a constraint worth knowing. By default, variation selection does not happen on the sales page itself. Visitors click the CTA and are redirected directly to the checkout page, with the specified products automatically added to their cart. FunnelKit documents two approaches for handling variable products on a sales page:
- Method 1: Preload a specific variation using a variation-specific URL. Get the exact variation ID for the variable product, then build a checkout URL that includes that variation ID as a parameter. Paste that URL into the CTA button on the sales page. When visitors click the CTA, they land on the checkout with that specific variation already in their cart.
- Method 2: Add the variable product at the checkout step and let visitors choose. Add the main variable product to the checkout step’s Products tab, and also add a Products field to your checkout form so visitors can select their preferred variation on the checkout page itself. Then copy the standard checkout URL and use it as the CTA link on the sales page. This keeps the sales page simpler and gives customers flexibility in their purchase.
See the FunnelKit documentation on adding variable products to a sales page for the exact URL format for Method 1 and the form field setup for Method 2.
For a full walkthrough of the checkout step configuration, see How to Set Up FunnelKit Checkout from Scratch.
Optional: Order Bumps, Upsells, and What Comes After the Sales Page
The sales page is just the entry point. The revenue-building steps come after checkout. Here is what you can stack, with a note on what requires Pro:
- Order bump (Pro only): An add-on offer that appears on the checkout page itself, before the customer places the order. Order bumps are not available on the free version of FunnelKit. Configured on the checkout step, not the sales page. See How to Set Up a FunnelKit Order Bump for the full setup.
- One-click upsell (Pro only): A post-purchase offer shown after the order is placed, before the thank-you page. One-click upsells require FunnelKit Pro. Add an upsell step after the checkout step in your funnel. See FunnelKit One-Click Upsell Not Working if you run into trouble.
- Thank-you page (free): The confirmation page at the end of the funnel. Always include one. FunnelKit tracks revenue and conversions through it.
You can also apply rule-based conditions so certain visitors see different offers based on what they already own or what is in their cart. That logic lives on the checkout and upsell steps, not the sales page. See FunnelKit Rule Engine Explained for how conditions work.
Worked Example: A Simple Three-Step FunnelKit Sales Page Funnel
Here is what a minimal but complete setup looks like from start to finish.
- Create the funnel. FunnelKit → Funnels → Add New Funnel. Choose a Sales Funnel template, pick a three-step design (sales page, checkout, thank you), name it
Product Launch Nov 2026, and click Done. - Edit the sales page. Click the sales page step, then Edit Elementor Template. Replace the placeholder headline with your product name and promise. Swap the hero image. Update the testimonial cards with real ones. Leave the CTA button text as-is for now. Update and close Elementor.
- Copy the next step button link. Back on the Design tab, copy the Next Step Button Link. Re-open Elementor, paste the link into every CTA button on the page. Update and close again.
- Configure the checkout step. Click the checkout step, go to Products, and add the product you are selling. Set the quantity to 1. Save.
- Add a thank-you page. The imported template already includes one. Click it, verify the confirmation text mentions the right product name, and save.
- Test the flow. Click View on the sales page step to open it in a browser tab. Click the CTA. Confirm you land on the checkout with the correct product in the cart. Place a test order: use a Stripe test card (card number
4242 4242 4242 4242, any future expiry, any CVC) if your store uses Stripe, or a PayPal sandbox account if you use PayPal. Confirm you reach the thank-you page and that the order appears in WooCommerce → Orders with the correct status. If you use a different payment gateway, check its documentation for sandbox or test-mode credentials before sending live traffic.
That is a working funnel. Everything else, order bumps and upsells (both Pro features), cart rewards, automation triggers, is additive from here.
Global Settings for Sales Pages: CSS and External Scripts
FunnelKit strips your WordPress theme styles from sales pages by design. That is usually what you want: no nav bar, no sidebar, no footer distractions. But it also means your brand fonts and colors do not carry over automatically.
You have two places to fix this:
- Global settings for all sales pages: Go to FunnelKit → Settings → Sales Pages. Here you can paste custom CSS and external JavaScript that apply to every sales page across all your funnels. Useful for brand fonts loaded from Google Fonts, a base color palette, or a tracking pixel that needs to fire on all sales pages.
- Page builder styling: Within any template, your page builder’s Style tab handles per-element colors, typography, borders, padding, and hover states. This is the right place for per-page design decisions.
If you need your WordPress theme’s CSS and JavaScript to load on sales pages (some builders require it), go to FunnelKit → Settings → Advanced and enable theme CSS and JavaScript for the Sales step type. That loads your active theme assets on those pages.
One caveat: enabling theme assets can introduce layout conflicts if your theme has an aggressive reset or opinionated global styles. Test on a staging environment first.
Cloning a Sales Page You Already Built
If you have a sales page design from another funnel that you want to reuse, you do not have to rebuild it. Inside any funnel, click Add New Step, choose the Sales page type, and select Clone instead of picking a new template. FunnelKit shows you a list of existing sales pages from other funnels. Pick the one you want and click Add.
FunnelKit copies the page design into the current funnel. The cloned page is independent, so edits to the clone do not affect the original. You still need to verify that the Next Step Button Link on the cloned page points to the checkout step in the new funnel, not the one it came from. That is the most common mistake when cloning: the link is usually still pointing to the original funnel’s checkout. Re-copy the link from the Design tab and re-paste it onto the CTA buttons.
Checking Stats on the Sales Page Step
FunnelKit tracks views, conversions, and attributed revenue for each step in your funnel. For the sales page step, a “conversion” is a click-through to the checkout step, so the conversion rate tells you how many visitors who saw the page actually made it to checkout. Basic funnel analytics are available on the free version; step-level analytics and visual canvas metrics require Pro.
In List mode, click into the sales page step and look for the Analytics tab. In Canvas mode (Pro only), stats appear directly on the step card in the flowchart. If your stats are showing zero or not updating, see FunnelKit Stats Not Tracking for the common causes.
Revenue shown on the sales page step includes order bump and upsell revenue attributed to visitors who entered through that step. That attribution is useful for comparing funnels when you are running traffic to multiple offers at the same time.
FAQ
What is the difference between a sales page and a landing page in FunnelKit?
FunnelKit uses both terms to describe the same step type: a non-checkout page at the top of a dedicated funnel. In the template library and documentation you will see both “sales page” and “landing page” used interchangeably for this step. There is no functional difference in how FunnelKit treats them.
Do I need FunnelKit Pro to add a sales page step?
No. Sales pages and opt-in pages are included in the free version of FunnelKit (the plugin listed on WordPress.org as “FunnelKit Funnel Builder,” also referred to as FunnelKit Lite in platform documentation). The free version also gives you basic funnel analytics and a one-step checkout. The Pro version adds Canvas mode (the visual flowchart builder), A/B testing, order bumps, one-click upsells, and multi-step checkouts. A basic sales page funnel, with a sales page, checkout, and thank-you page, works on the free plan. You only need Pro when you want to add order bumps, post-purchase upsells, or run split tests.
My CTA button on the sales page goes to a 404. What is wrong?
The most common cause is a hardcoded URL that no longer exists, or a Next Step Button Link that was never pasted into the button. Open the Design tab on the sales page step, copy the Next Step Button Link, re-open your page builder, and paste it into the button link field. Also confirm the checkout step exists and is not in draft mode.
Can I use a sales page funnel to sell variable products (products with variants)?
Yes, and FunnelKit documents two approaches. Method 1: get the exact variation ID for the variable product, build a checkout URL with that variation ID as a parameter, and paste it as the CTA button link. Visitors land on checkout with that specific variation already in their cart. Method 2: add the main variable product to the checkout step’s Products tab, add a Products field to your checkout form, copy the standard checkout URL, and use it as the CTA link. Visitors choose their variation on the checkout page itself. See the <a href=’https://funnelkit.com/docs/funnel-builder/how-to/add-variable-products-on-sales-page/’ rel=’nofollow’>FunnelKit documentation on variable products on a sales page</a> for the exact URL format and form field setup.
How do I remove the navigation bar and sidebar from my FunnelKit sales page?
FunnelKit removes theme navigation automatically on sales page steps, so in most cases nothing extra is required. If your theme’s header or sidebar is still appearing, check whether you have enabled “Theme CSS and JavaScript” under FunnelKit Settings → Advanced for the Sales step type. Disabling that option (or reviewing your theme’s forced template output) usually resolves it.
Can I A/B test two versions of the same sales page?
Yes, but only on FunnelKit Pro. A/B testing is not available on the free version of FunnelKit. On Pro with Canvas mode active, there is a Run A/B Test action on the sales page step card that lets you create a variation of the page and split traffic between them. FunnelKit tracks views, conversions, and revenue separately for each variant.
Sources:
Sources: FunnelKit Funnel Builder Overview; Create a Dedicated Sales Funnel; Building a Sales Page from Scratch; Customize the Pre-Built Template; Sales Pages FAQ; Settings (Sales Pages); Global Settings (Page-Specific); Canvas Mode; Clone a Funnel Step; Add Variable Products on Sales Page; FunnelKit Lite vs Pro; FunnelKit Product Suite FAQ; FunnelKit on WordPress.org. All accessed November 2026.
Brian Kasday spent forty years in direct-response marketing before rebuilding the whole operation as a one-person shop. He writes The Operator’s Library — including “The Missing Manual for FunnelKit” — for operators who’d rather build it themselves than wait on someone else.
Get the Builder’s Companion Kit — the free checklists and templates that pair with this guide: mmsvegas.com/op/funnelkit-resources/.
This guide fixes one FunnelKit step. The Missing Manual for FunnelKit covers the whole checkout system. See the manual →
More FunnelKit guides
Free · FunnelKit Operator Toolkit
Building checkouts in FunnelKit?
Get the free operator toolkit — order-bump templates, checkout checklists, and a note when what you just read changes.
Get the free toolkit →