
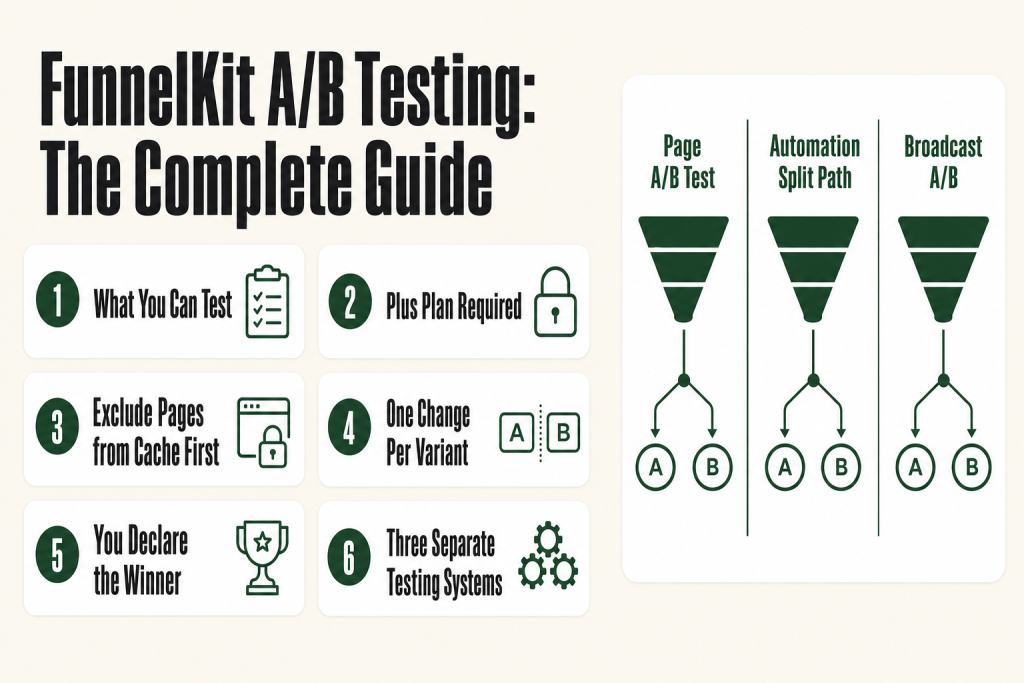
The 30-second answer
- What you can test: Opt-in pages, sales pages, checkout pages, order bumps, one-click upsells, and thank you pages.
- Plan required: A/B testing is available on the Plus plan and above. The Basic plan does not include it.
- How to start: Open your funnel, click “A/B Test” next to the page you want to test, then click “Add Variant.”
- Variant options: Duplicate the original or start a new variant from scratch (or pull a template from another funnel).
- Traffic split: Set the percentage going to each variant. You control the split manually.
- Declaring a winner: Click “Declare Winner” in the Analytics tab, confirm the winning variant, and 100% of traffic routes there automatically.
- Critical prerequisite: Exclude every page under test from your caching plugin before you launch. Cached pages break the traffic split.
Take this fix into your next scenario. The free Builder’s Companion Kit collects the checklists and templates that pair with this guide — so next time, you start from a template, not a blank page. Grab it free →
- What FunnelKit A/B Testing Actually Covers
- Which Plan You Need
- The Caching Step You Must Do First
- How to Set Up a FunnelKit A/B Test: Full Walkthrough
- What to Actually Test on Each Page Type
- How to Read the Analytics and Declare a Winner in FunnelKit A/B Testing
- A/B Testing Inside FunnelKit Automations: Split Path Testing
- A/B Testing Broadcast Emails
- Mistakes That Make Your Test Results Worthless
- FAQ
FunnelKit A/B testing is built directly into the Funnel Builder. No external plugin, no third-party dashboard, no copy-pasting URLs between tools. You create a variant, set the traffic split, and let FunnelKit track the numbers. When you have enough data, you declare a winner and all future traffic goes there automatically. This article walks you through the entire process: what you can test, how to set it up, how to read the analytics, and the one caching step that breaks tests if you skip it.
What FunnelKit A/B Testing Actually Covers
The short answer: every page type in a funnel. Order bumps, one-click upsells, checkout pages, opt-in pages, sales pages, and thank you pages are all fair game. You test them individually, one page at a time, inside the same Funnel Builder you already use to build the funnel.
Within any of those pages, you can change anything your page builder exposes: headlines, button copy, button color, background, price display, layout, video versus text, form fields, and more. Think of each variant as a complete alternate version of the page, not just a tweaked element. You swap the whole page; the builder handles the rest.
One practical constraint worth knowing: FunnelKit’s built-in test runs two variants at a time per step. If you want to run a true multivariate test or more than two variants simultaneously on a single step, this isn’t the right tool for that. Stick to one question per test and you’ll get cleaner, actionable data.
Which Plan You Need
A/B testing is not available on the Basic plan. It is included from the Plus plan and above (Plus, Professional, and Elite). If you’re on Basic and you click into a funnel page, you won’t see the “A/B Test” button at all.
Verify your current license tier under FunnelKit > License before you go looking for the button. Upgrading is done through your FunnelKit account dashboard. Pricing changes, so check the official FunnelKit pricing page for current numbers rather than anything cached here.
The Caching Step You Must Do First
This is the one step people skip, and it silently ruins the test. When a caching plugin serves a stored copy of a page, every visitor hits the same cached version. The traffic split FunnelKit sets up never runs because visitors never reach the live PHP code that routes them to a variant. Your analytics show skewed or flat numbers and you have no idea why.
Before you set up any test, go into your caching plugin (WP Rocket, LiteSpeed Cache, W3 Total Cache, or whatever you use) and exclude the URLs for every page involved in the test. That means the opt-in page, landing page, checkout page, upsell pages, and thank you page. Add them to the exclusion list, clear existing cache for those URLs, and then configure your A/B test.
If you’re unsure how to add exclusions in your specific caching plugin, search the plugin’s own documentation for “page exclusions” or “URL exclusions.” The FunnelKit docs call this out prominently for good reason.
How to Set Up a FunnelKit A/B Test: Full Walkthrough
Here’s the complete sequence from a live funnel to a running test.
- Open your funnel. Go to FunnelKit > Funnels and open the funnel that contains the page you want to test. If you don’t have a funnel yet, see How to Set Up FunnelKit Checkout from Scratch first.
- Click “A/B Test” on the target page. Each page row in the funnel editor has an “A/B Test” button next to it. Click the one for the page you want to split-test. You’ll land on the A/B test configuration screen, where you can see 100% of traffic going to the original.
- Add a variant. Click Add Variant. You get three options: create a duplicate of the original, start a brand-new variant from scratch, or pull a template from another funnel you’ve already built.
- Edit the variant. Click Edit on the new variant to open it in your page builder. Make the change you’re testing. Keep it to one change at a time. If you test three things at once and the variant wins, you won’t know which of the three caused it.
- Set the traffic split. Back on the A/B test screen, set the percentage going to each variant. A 50/50 split is common for a clean test. You can weight it differently if you want to protect most of your revenue while testing (for example, 80% original, 20% variant).
- Publish and run. Activate the test. FunnelKit starts routing visitors according to the percentages you set and begins recording views, conversions, and revenue per visit for each variant.
What to Actually Test on Each Page Type
The setup steps are the same regardless of page type, but what you change depends on which page you’re testing. Here are starting points that tend to produce usable data quickly.
- Checkout page: One-step versus two-step versus three-step layout is a classic first test. Layout alone changes how much form friction a buyer feels before they commit. See FunnelKit Checkout Fields Customization for how to set up each layout variant cleanly.
- Order bump: Test the bump skin (design), the headline copy, or the offer itself. A bump that appears compelling in your head sometimes flops with real buyers, and a simple copy change can reverse that. See How to Set Up a FunnelKit Order Bump if you haven’t built the bump yet.
- One-click upsell: Test a video sales letter (VSL) page against a text-based page. Test offer price. Test whether a countdown timer changes conversion. One thing at a time.
- Opt-in page: Headline and sub-headline are the highest-leverage variables on lead gen pages. Test those before touching anything else.
- Thank you page: Test whether adding a next-step CTA (a related offer, a community link, a calendar invite) changes downstream behavior. The thank you page is underused as a testing surface.
A rule I apply myself: never run a test until you have a written hypothesis. “I think changing the headline to focus on the outcome rather than the process will increase checkout conversions.” That sentence forces you to define what you’re measuring and why. Without it, you end up staring at a number and not knowing what to do next.
How to Read the Analytics and Declare a Winner in FunnelKit A/B Testing
Once the test is running, FunnelKit tracks views, conversions, revenue per visit, conversion rate, and total revenue for each variant. You see all of this inside the Analytics tab on the A/B test screen. The key number is conversion rate, but don’t ignore revenue per visit if there’s a price difference between variants. A variant with a slightly lower conversion rate can still generate more total revenue if the order value is higher.
FunnelKit does not auto-declare a winner. That call stays with you. When you’ve collected enough data to be confident, go to the Analytics tab and click Declare Winner. A confirmation popup appears. Click the Winner button next to the variant name that performed best. Confirm. FunnelKit immediately routes 100% of future traffic to that variant and stops the test.
How much data is “enough”? FunnelKit doesn’t set a threshold for you because the right sample size depends on your baseline conversion rate and how big a difference you’re trying to detect. A general rule of thumb from basic statistics: run the test until each variant has received at least a few hundred unique visits, and run it long enough to cover multiple days of the week (weekend traffic often behaves differently than weekday traffic). If you’re running a low-traffic store, accept that tests will take longer. Don’t cut them short at 30 visits and call it.
A/B Testing Inside FunnelKit Automations: Split Path Testing
Funnel page testing and automation testing are two separate systems in FunnelKit. If you want to test email sequences rather than pages, you use the Split Test step inside FunnelKit Automations, not the page-level A/B test described above.
To add a split to an automation, open the automation, click the (+) icon at the point in the workflow where you want the split, and select Split Test. Set the number of paths you want (up to three paths per split, per the current docs). Name each path for your own reference, then build different actions under each path. For example, Path A sends an email with a 10% discount offer and Path B sends a social-proof email. Contacts are divided between paths according to the percentages you set.
This is useful for testing subject lines, email body copy, wait delays, or entirely different follow-up sequences. If you’re running cart abandonment sequences, a split test on the first recovery email subject line is a fast way to find the phrasing that gets opens. If your automations aren’t triggering at all, check FunnelKit Automation Not Triggering before adding a split layer on top of a broken workflow.
A/B Testing Broadcast Emails
Broadcasts have their own A/B testing flow, separate from both page tests and automation split paths. When you create a new broadcast in FunnelKit Automations, you’ll see a Type field on the broadcast setup screen. Select A/B Testing as the type before you move to the next step.
You then build at least two email variants. The first is labeled Control. Additional variants are labeled Variant A, Variant B, and so on. Each gets its own subject line and body.
The optional Smart Sending feature is worth knowing about. When you enable it, FunnelKit sends the test to a sample of your list first, waits a defined period, checks which variant got more opens, and then sends that variant to everyone else automatically. This is useful for larger lists where you want the test to resolve itself without a manual check-in. For small lists, you may not have enough sample data to make Smart Sending meaningful, so skip it and just review results manually after sending.
If your broadcasts aren’t reaching recipients at all, sort that out first. See FunnelKit Broadcast Not Sending before you layer in A/B testing.
Mistakes That Make Your Test Results Worthless
I’ve made most of these. They’re easy to avoid once you know them.
- Testing too many changes at once. If your variant has a new headline, new button color, and a different layout, and it wins, you have no idea what to attribute the win to. Test one thing. Always.
- Calling the test too early. A variant that’s ahead after 40 visits is not a winner. Statistical noise looks like signal at small sample sizes. Wait.
- Not excluding pages from cache. Covered above, but worth repeating: cached pages mean the traffic split never runs. Your analytics will look broken or flat.
- Running a test during an unusual traffic period. If you launch a test the same week you send a big promo email or run paid ads to a cold audience, the traffic mix changes. The test results won’t generalize to your normal audience.
- Ignoring revenue per visit in favor of conversion rate alone. A higher conversion rate on a lower-priced variant can still mean less money. Look at both numbers before you declare a winner.
- Forgetting that funnel stats track the whole funnel. If your checkout stats look off during a test, cross-reference with FunnelKit Stats Not Tracking to rule out a tracking issue before blaming the test design.
FAQ
Does FunnelKit A/B testing work with Elementor, Divi, and Gutenberg?
Yes. The A/B test is set up at the funnel level in FunnelKit, and each variant is edited with whichever page builder you chose when you built the funnel. Elementor, Divi, Gutenberg, Oxygen, and other compatible builders all work. The testing system itself is builder-agnostic.
Can I A/B test an order bump or one-click upsell, or only full pages?
You can test order bumps and one-click upsell pages individually. Each funnel step has its own A/B Test button. You’re not limited to top-of-funnel or checkout pages.
What happens to the losing variant when I declare a winner?
FunnelKit stops sending traffic to the losing variant immediately. All future visitors go to the winning variant. The losing variant’s data stays in the analytics history so you can reference it later.
Does FunnelKit automatically declare a winner when statistical significance is reached?
No. FunnelKit does not auto-declare a winner. The call is yours to make. You review the analytics, decide you have enough data, click Declare Winner, and confirm your choice. The judgment stays with you.
How is funnel page A/B testing different from split path testing in automations?
They are separate systems. Funnel page A/B testing splits live website traffic between two versions of a page. Automation split path testing divides contacts inside an automation workflow into different action sequences, such as different email subject lines or follow-up timing. You set them up in different places.
My A/B test shows both variants getting the same traffic. What’s wrong?
The most common cause is a caching plugin serving the same cached page to all visitors, which bypasses the FunnelKit traffic routing entirely. Exclude all pages under test from your caching plugin, clear the cache for those URLs, then check whether the split resolves. Also confirm that your license tier is Plus or above, since the Basic plan does not include A/B testing.
Sources:
Sources: FunnelKit Docs: Getting Started with Integrated A/B Testing; FunnelKit Docs: Setting Up A/B Test; FunnelKit Docs: Review Stats and Declare a Winner; FunnelKit Docs: A/B Test Ideas and Examples; FunnelKit Docs: How A/B Testing Works; FunnelKit Docs: Split Path Testing in Automations; FunnelKit Docs: A/B Testing Broadcasts; FunnelKit FAQ: Plan Features. All documentation verified September 2026.
Brian Kasday spent forty years in direct-response marketing before rebuilding the whole operation as a one-person shop. He writes The Operator’s Library — including “The Missing Manual for FunnelKit” — for operators who’d rather build it themselves than wait on someone else.
Get the Builder’s Companion Kit — the free checklists and templates that pair with this guide: mmsvegas.com/op/funnelkit-resources/.
This guide fixes one FunnelKit step. The Missing Manual for FunnelKit covers the whole checkout system. See the manual →
More FunnelKit guides
Free · FunnelKit Operator Toolkit
Building checkouts in FunnelKit?
Get the free operator toolkit — order-bump templates, checkout checklists, and a note when what you just read changes.
Get the free toolkit →