
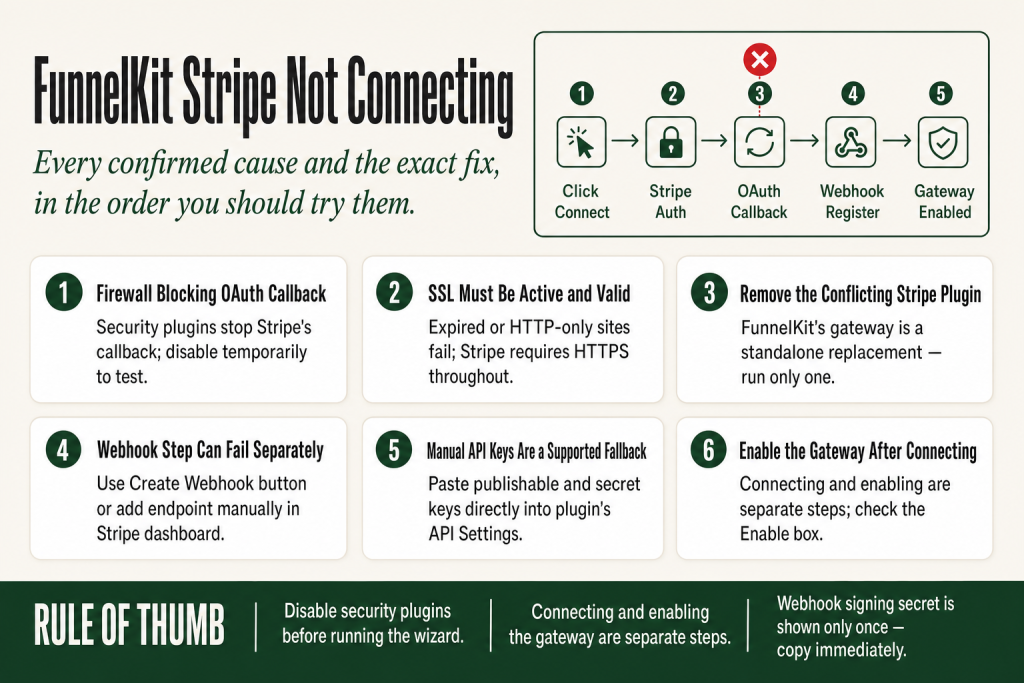
The 30-second answer
- OAuth redirect blocked: A firewall, security plugin, or server rule is stopping the Stripe authorization callback from reaching your site. Whitelist Stripe IPs or temporarily disable the security plugin to test.
- Wrong Stripe account selected: You authenticated successfully but connected a test account or the wrong brand account. Disconnect and reconnect, then select the correct account at the account-chooser screen.
- SSL not active: Stripe requires HTTPS. If your SSL certificate is expired or misconfigured, the connection will fail, sometimes with a TLS error or an SSL certificate warning, sometimes silently depending on where in the flow it breaks.
- Conflicting Stripe plugin: Running the official WooCommerce Stripe plugin alongside FunnelKit’s Stripe Gateway causes conflicts. Use only one. FunnelKit’s gateway is a standalone replacement, not an add-on. Once it’s confirmed working, deactivate and uninstall the other plugin.
- Webhook creation failed mid-setup: The account connected but the webhook step errored out. Go to WooCommerce → Settings → Payments → Stripe Gateway → Manage → Stripe Settings and use the Create Webhook button there, or set up the webhook manually via Stripe’s dashboard.
- Onboarding wizard stalled: If the OAuth flow never returns, clear cache, switch browsers, and try again. If it still fails, use manual API key entry in the plugin’s API Settings as a fallback.
- Gateway not enabled after connection: Connection succeeded but the payment method is still toggled off. Go to WooCommerce → Settings → Payments, click Manage next to Stripe Gateway, open the Credit Cards section, and check the box next to Enable Stripe Gateway.
Take this fix into your next scenario. The free Builder’s Companion Kit collects the checklists and templates that pair with this guide — so next time, you start from a template, not a blank page. Grab it free →
- How the FunnelKit Stripe Connection Works
- OAuth Redirect Blocked by a Firewall or Security Plugin
- SSL Is Missing, Expired, or Misconfigured
- A Conflicting Stripe Plugin Is Already Active
- The Connection Succeeded But the Webhook Step Failed
- The Onboarding Wizard Won’t Complete: Use Manual API Keys
- Stripe Connected But the Payment Method Still Doesn’t Show at Checkout
- Test Mode vs. Live Mode Mismatch
- How to Read Logs and Order Notes to Diagnose Payment Failures
- FAQ
FunnelKit Stripe not connecting is the kind of problem that shuts your store down completely. No gateway, no sales. The frustrating part is that the onboarding wizard is designed to handle the connection quickly, but it’s not foolproof, and when it fails the error messages are rarely specific enough to tell you what actually went wrong. Manual steps and troubleshooting are a normal part of the process. One thing worth knowing up front: FunnelKit’s Stripe Gateway is a third-party plugin built by FunnelKit (Wisetr INC.), not an official product of Stripe or WooCommerce. It connects to Stripe’s API and runs on WooCommerce, but support and updates come from the FunnelKit team, not from Stripe or Automattic. That matters when you’re diagnosing problems, because the fix often lives in the plugin’s own settings, not in Stripe’s dashboard. This article walks through every confirmed cause and the exact fix for each one, in the order you should try them. Your judgment on what to test and when to escalate stays with you throughout.
How the FunnelKit Stripe Connection Works
Before you can fix the problem, you need to understand what the connection is actually doing. FunnelKit’s Stripe Gateway is a third-party plugin built by FunnelKit (Wisetr INC.) that connects your WooCommerce store to Stripe’s API. It is not an official Stripe product and not an official WooCommerce extension. FunnelKit built it to integrate deeply with its own product suite, including one-click upsells and post-purchase flows that other Stripe gateways don’t support natively. FunnelKit describes itself as an official Stripe partner, but the plugin is maintained and supported by FunnelKit’s own team. That distinction is practical: if you hit a bug, the place to look is FunnelKit’s documentation and changelog, not Stripe’s support queue.
The plugin uses an OAuth-style onboarding wizard rather than asking you to copy-paste API keys by hand. The goal is speed: when the wizard works, it handles both API key retrieval and webhook registration in one flow. When it doesn’t, you have a manual fallback, and that fallback is documented and supported.
Here is what the onboarding sequence does, step by step:
- You click Start Onboarding Wizard inside the plugin after installation.
- You click Connect with Stripe, which opens the Stripe authorization page.
- You enter your Stripe email and password, then verify with the 6-digit code sent to your registered phone number.
- You select which Stripe account to connect (important if you manage multiple accounts).
- You click Connect.
- The plugin prompts you to enable the payment gateways you want to offer.
- You click Setup Webhook Now to register the webhook automatically.
- You confirm whether to enable express checkout (Apple Pay, Google Pay), then choose your mode (Test or Live) and click Save and Review Settings.
When it works, the wizard fetches your live and test keys automatically, registers the webhook, and leaves you with a fully wired gateway in a couple of minutes. When any step breaks, the connection either fails with a visible error or gets stuck mid-flow. Either way, there’s a fix for each failure point. The steps below hand you the fix, but you’re the one who decides which path to follow for your specific setup.
OAuth Redirect Blocked by a Firewall or Security Plugin
This is the most common cause. After you authenticate on Stripe’s side, Stripe redirects your browser back to your WordPress site with a callback URL. If a firewall, bot-protection rule, or a security plugin (Wordfence, iThemes Security, Sucuri, and similar) blocks that callback, the connection never completes. Your browser often just hangs or returns to the plugin dashboard without a confirmation message.
How to test this quickly: temporarily deactivate your security plugin, clear your browser cache, and run the onboarding wizard again. If the connection succeeds, you know the security plugin is the culprit. Re-enable the plugin and add an exception for Stripe’s IP ranges or the callback URL pattern. Your security plugin’s documentation will show you where to whitelist URLs.
A few other things that cause the same symptom:
- Cloudflare or a CDN in front of your site with aggressive bot-fight mode. Toggle it off during the connection, then re-enable.
- A WordPress login page protected by IP restriction, which blocks the callback because it arrives from a Stripe IP.
- The site is behind HTTP basic authentication (common on staging environments). Stripe cannot complete the redirect to a password-protected URL.
If you’re on a staging site and the live domain is what Stripe has on file, the redirect will land on the wrong URL entirely. Connect on your live domain, or update your Stripe redirect URLs to match staging.
SSL Is Missing, Expired, or Misconfigured
Stripe requires HTTPS for every site that processes or connects to its platform. If your SSL certificate is expired, self-signed, or your site is still running on HTTP, the OAuth flow can fail. The error isn’t always clean: Stripe can return a TLS error on the webhook side, an SSL certificate warning during the API handshake, or in some cases the flow simply drops without a specific message depending on where the certificate problem sits. Don’t assume it’s silent until you’ve checked.
Check your SSL status quickly by visiting your site in Chrome and looking at the padlock icon in the address bar. If there is a warning or the connection is flagged as “not secure,” fix the certificate first. Tools like SSL Labs will show you the exact certificate error. Once the cert is clean and HTTPS is confirmed, retry the onboarding wizard.
One edge case: your domain resolves on HTTPS but your WordPress Address (URL) in Settings → General is still set to http://. That mismatch causes the callback URL sent to Stripe to be HTTP even though the cert exists. Fix the WordPress URL first, then try again.
A Conflicting Stripe Plugin Is Already Active
If you installed FunnelKit’s Stripe Gateway on a store that already runs the official WooCommerce Stripe plugin, you have two plugins competing for the same gateway slot. This causes both connection and payment errors.
FunnelKit’s gateway is a standalone replacement, not an add-on. It’s built to go deeper than the official plugin, supporting use cases like post-purchase upsells when the cart total is zero. Switching to it makes it your primary Stripe gateway plugin. Once you’ve confirmed FunnelKit’s Stripe Gateway is connected and processing correctly, deactivate and uninstall the old plugin. FunnelKit’s own FAQ is direct on this point: make the switch, confirm it works, then remove the old plugin. Don’t try to run them side by side.
This also matters for one-click upsells. FunnelKit’s Stripe Gateway is built to support post-purchase upsell flows natively, including zero-dollar checkouts. If you’re using the official Stripe plugin for upsells, you may hit payment errors that the FunnelKit gateway resolves on its own. If upsell payments are failing alongside the connection issue, see FunnelKit One-Click Upsell Not Working after you fix the gateway.
The Connection Succeeded But the Webhook Step Failed
Sometimes the OAuth step works fine and your account connects, but the Setup Webhook Now step errors out or the wizard skips past it without registering the webhook. Without a working webhook, Stripe can’t send payment events to your store, which means orders can get stuck, subscription payments can fail silently, and one-click upsells break at the charge step.
There’s a shortcut worth trying first: go to WooCommerce → Settings → Payments → Stripe Gateway → Manage → Stripe Settings and scroll down. You’ll see a Create Webhook button there that re-triggers automatic webhook registration without re-running the full wizard. Try that before going manual.
If that button fails or isn’t available, set up the webhook manually. Here is how:
- Log in to your Stripe dashboard. In the left navigation, click Developers and select Webhooks.
- Make sure the mode toggle is set to the correct mode (Test or Live, matching what your store uses).
- Click + Add endpoint.
- In your WordPress admin, go to WooCommerce → Settings → Payments → Stripe Gateway → Manage → Stripe Settings. From there, navigate to the API Settings section (also reachable via the Stripe Woo Payment Gateway menu in that same screen). Copy the webhook URL shown there.
- Paste that URL into the Stripe endpoint URL field.
- Select the Stripe events you want to send. Follow the FunnelKit webhook documentation to confirm the exact event list your setup needs.
- Click Add endpoint to activate it.
- Stripe generates a webhook signing secret. Copy it immediately and paste it somewhere secure before navigating away. The signing secret is shown only at the moment of creation and cannot be retrieved again from the Stripe dashboard later.
- Back in your plugin’s API Settings, paste the webhook secret key and save.
A note on key security: Stripe treats secret API keys and webhook signing secrets as sensitive credentials, equivalent to a username and password. Keep them out of source code, email, chat, and any unencrypted channel. Don’t commit them to a code repository and don’t store them in plain text outside a secure secrets manager. Paste the signing secret directly into the plugin’s settings field. If you believe a key has been exposed, treat it as compromised and regenerate it from your Stripe dashboard immediately. Those judgment calls are yours to make, and no plugin or guide can make them for you.
If you need both a test and live webhook, repeat the process with the mode toggle in the opposite position.
The Onboarding Wizard Won’t Complete: Use Manual API Keys
If the OAuth onboarding wizard keeps failing regardless of what you try, FunnelKit’s own documentation confirms there is a manual fallback: you can configure your API keys directly in the plugin’s API Settings screen. This is the escape hatch the team built for exactly this situation.
To find your API keys, log in to your Stripe dashboard. Navigate to the Developers section in the left sidebar and open the API Keys tab. You’ll see a publishable key and a secret key for both Test and Live modes. Copy each one.
A few things to handle carefully here. Stripe’s own documentation is direct on this: secret API keys are sensitive credentials, equivalent to a username and password. Don’t share them over email, chat, or any unencrypted channel. Don’t put them in source code or commit them to a repository. Bad actors continuously scan public repositories for Stripe keys. Paste them directly into the plugin’s API Settings field and nowhere else. If you think a key was exposed, assume it has been compromised and regenerate it from your Stripe dashboard immediately. The decision about how to handle and store your own keys is yours to make.
In WordPress, go to WooCommerce → Settings → Payments. Find the Stripe gateway entry, click Manage, and locate the API Settings section (labeled Stripe API Settings in the plugin interface, accessible from the Stripe Woo Payment Gateway screen). Paste your publishable and secret keys there. Save.
After saving, the gateway should activate. You’ll still need to set up the webhook manually using the steps in the previous section, since the auto-webhook step is part of the wizard you bypassed.
One caveat worth knowing: the WordPress.org plugin changelog shows various bug fixes and improvements across releases. If you hit unexpected errors on the API Settings page during manual key entry, make sure your plugin is updated to the latest version before trying again. Check the changelog on the WordPress.org plugin page to confirm what the current release includes.
Stripe Connected But the Payment Method Still Doesn’t Show at Checkout
This one catches people off guard. The wizard completes without errors, Stripe shows as connected in the plugin, but customers still can’t see or use the payment option at checkout. The reason is that connecting your account and enabling a payment method are two separate steps.
Go to WooCommerce → Settings → Payments. Find Stripe Gateway – Credit Card (Stripe) in the list. Click Manage. Inside the Credit Cards section, check the box next to Enable Stripe Gateway. Save changes.
The same applies to express checkout buttons (Apple Pay, Google Pay) and local payment methods (iDEAL, SEPA, Bancontact, P24). Each payment method has its own enable toggle and must be activated separately. Connecting your Stripe account doesn’t flip those toggles for you. For express checkout, go back to the same Manage screen and look for the Express Checkout section, then click Enable Express Checkout there.
For local payment methods, there is also a currency and country matching requirement. If your WooCommerce store currency doesn’t match what the local method supports, it won’t appear even when enabled. Check WooCommerce → Settings → General for your store currency if a specific local gateway keeps disappearing.
If express checkout buttons are enabled but still invisible on your checkout page, that’s a separate issue covered in detail at FunnelKit Express Checkout Not Showing.
Test Mode vs. Live Mode Mismatch
A mode mismatch is subtle and easy to create. Your plugin is in Live mode but your Stripe API keys are Test keys, or the reverse. The connection appears to work, but payments fail, test transactions don’t record, or the gateway behaves erratically.
The plugin supports three modes: Test Mode, Admin Only Test Mode (admins see test payments, customers see live), and Live Mode. To switch modes, go to WooCommerce → Settings → Payments, find the Stripe gateway entry, click Manage, then navigate to Stripe API Settings and change the mode dropdown. Confirm that the keys stored there belong to the same mode you’re switching to.
To test your setup properly before going live, use Stripe’s test card numbers inside Test mode. Once testing is complete, switch to Live mode and confirm you’ve connected Live keys, not Test keys. If you connected via the wizard, both sets of keys are fetched automatically, but double-check after any reconnection that the active mode matches the keys in use.
If your store has an active checkout funnel and you’re debugging payment failures alongside this, also check FunnelKit Checkout Not Loading and FunnelKit Primary Order Accepted Status Stuck, since a misconfigured gateway often surfaces in both of those symptoms at the same time.
How to Read Logs and Order Notes to Diagnose Payment Failures
Once the gateway is connected but payments are still failing, you need data. FunnelKit’s Stripe Gateway has a built-in logging option. Enable it by going to the payment gateway’s Stripe Settings and switching on Log Debug Messages. After that, reproduce the failed payment, then review the log file to see the exact API error returned by Stripe.
For specific failed orders, go to WooCommerce → Orders, open the failed order, and read the order notes section. The reason for the failure is recorded there. This is the fastest way to determine whether a payment failed because of a declined card, a currency mismatch, an authentication requirement, or a webhook delivery problem.
If orders are getting stuck before they complete, that can be a sign of a webhook delivery failure rather than a connection failure. A stuck order that never updates from “pending” is often a webhook problem, not an API key problem. Verify your webhook is listed and active in your Stripe dashboard under the Developers section, and that recent delivery attempts show success.
Logs and order notes give you the data. Reading them and deciding what to act on is still your job. If a log entry points to something outside this guide, Stripe’s own error code reference and FunnelKit’s support team are the right next steps, not more guessing.
Payment failures that involve post-purchase upsells or order bumps have their own failure modes. If you’re seeing payment errors specifically on those, also check FunnelKit Order Bump Not Converting for bump-specific causes.
FAQ
funnelkit stripe not connecting after clicking connect with stripe
The most common cause is a firewall or security plugin blocking the OAuth callback from Stripe. Temporarily deactivate your security plugin, clear cache, and try the wizard again. If that fixes it, whitelist the callback URL pattern in your security plugin. SSL must also be active and valid on your site or the connection will fail, sometimes with an explicit TLS or certificate error, sometimes without a specific message depending on where the problem sits.
can i manually enter stripe api keys in funnelkit instead of using the wizard
Yes. FunnelKit’s own setup documentation confirms that if the onboarding wizard fails, you can manually enter your API keys in the plugin’s API Settings screen. Get your publishable and secret keys from the Developers section of your Stripe dashboard (via the API Keys tab), paste them into WooCommerce > Settings > Payments > Stripe Gateway > Manage > Stripe API Settings, and save. Stripe’s documentation is explicit: secret API keys are sensitive credentials that must stay out of email, chat, source code, and any unencrypted channel. Paste them directly into the plugin’s settings field and nowhere else. If you believe a key has been exposed, treat it as compromised and regenerate it from your Stripe dashboard immediately. You’ll still need to configure the webhook manually after doing this.
funnelkit stripe webhook creation failed what do i do
First try the built-in shortcut: go to WooCommerce > Settings > Payments > Stripe Gateway > Manage > Stripe Settings and scroll down to the Create Webhook button. That re-triggers automatic registration without the full wizard. If that fails, go to your Stripe dashboard, click Developers in the left navigation, select Webhooks, and add a new endpoint using the webhook URL from your plugin’s API Settings. Select the required events and save. Stripe generates a webhook signing secret at that moment. Copy it immediately: it’s shown only once and cannot be retrieved from the dashboard later. Paste it into the plugin’s API Settings. Keep the signing secret out of emails, chat messages, and source code. Do this for both Test and Live modes if you use both.
stripe is connected in funnelkit but no payment options show at checkout
Connecting your Stripe account and enabling a payment method are two separate steps. Go to WooCommerce > Settings > Payments, find Stripe Gateway – Credit Card (Stripe), click Manage, and check the box to enable it under the Credit Cards section. Each payment method, including local gateways and express checkout buttons, has its own enable toggle and must be activated separately.
should i use the official woocommerce stripe plugin or funnelkit’s stripe gateway
Use only one. Running both simultaneously causes conflicts. FunnelKit’s Stripe Gateway is a standalone replacement built to integrate deeply with FunnelKit’s funnel builder, one-click upsells, and order bumps, including zero-dollar checkout scenarios that the official plugin doesn’t support. FunnelKit’s own documentation is clear: once you switch to FunnelKit’s gateway and confirm it’s working correctly, deactivate and uninstall the other Stripe plugin. The call on which gateway fits your setup is yours, but running both at the same time isn’t a supported configuration.
how do i switch funnelkit stripe from test mode to live mode
Go to WooCommerce > Settings > Payments, find the Stripe gateway entry, click Manage, and navigate to Stripe API Settings. Change the mode from Test to Live and save. Confirm that the API keys stored in that same screen are Live keys, not Test keys. If you connected via the wizard originally, both key sets were fetched automatically.
Sources:
Sources: FunnelKit Stripe Setup and Onboarding; FunnelKit Stripe Webhooks; FunnelKit: Webhook Creation Failed; FunnelKit: Users Unable to Make Payments; FunnelKit: Credit and Debit Card Gateway Setup; FunnelKit: Live, Admin Only and Test Modes; FunnelKit: Local Gateway Not Showing; FunnelKit Stripe Gateway Overview; FunnelKit: Express Checkout Setup; FunnelKit Stripe Gateway Plugin Changelog (WordPress.org); Stripe: Best Practices for Managing Secret API Keys. All documentation accessed August 2026.
Brian Kasday spent forty years in direct-response marketing before rebuilding the whole operation as a one-person shop. He writes The Operator’s Library — including “The Missing Manual for FunnelKit” — for operators who’d rather build it themselves than wait on someone else.
Get the Builder’s Companion Kit — the free checklists and templates that pair with this guide: mmsvegas.com/op/funnelkit-resources/.
This guide fixes one FunnelKit step. The Missing Manual for FunnelKit covers the whole checkout system. See the manual →
More FunnelKit guides
Free · FunnelKit Operator Toolkit
Building checkouts in FunnelKit?
Get the free operator toolkit — order-bump templates, checkout checklists, and a note when what you just read changes.
Get the free toolkit →