
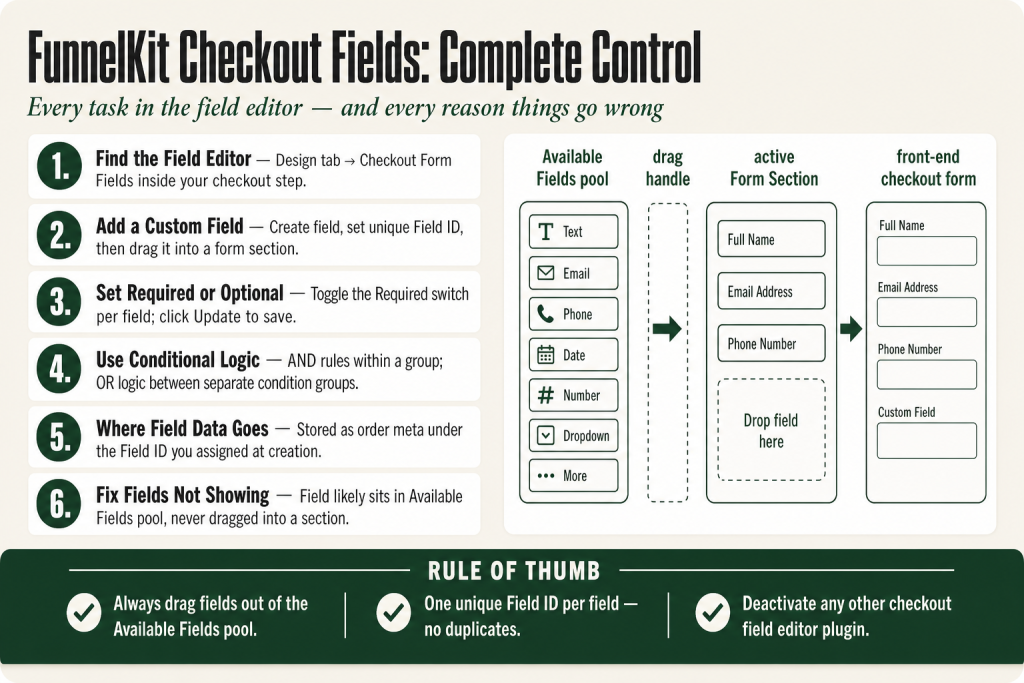
The 30-second answer
- Where to find the editor: open your checkout step, go to the Design tab, and scroll to Checkout Form Fields.
- Add a custom field: click Add New Field, choose a field type, fill in a unique Field ID (Order Meta Key), then drag the new field into the section where you want it.
- Remove a field: hover over the field row and click the trash icon, then confirm.
- Reorder fields or sections: drag and drop them into position.
- Required vs. optional: toggle the Required switch on the field row, then click Update.
- Conditional fields: click Add Condition on the target field, set AND/OR rules based on cart, user, or country data.
- Field change not saving: confirm you clicked Save (not just closed the modal), check for a conflicting checkout field editor plugin, and clear your cache.
- Field not showing: verify the field was dragged into a section, not left in the Available Fields pool, and confirm no active conditional rule is hiding it.
Take this fix into your next scenario. The free Builder’s Companion Kit collects the checklists and templates that pair with this guide — so next time, you start from a template, not a blank page. Grab it free →
- Where the FunnelKit Field Editor Lives
- Editing Existing Billing and Shipping Fields
- Making Fields Required or Optional
- Adding Custom Fields to Your FunnelKit Checkout Fields Setup
- Setting Up Conditional Fields
- Where Custom Field Data Goes and How to Use It
- Worked Example: Adding a Conditional Gift-Message Field
- Third-Party Plugin Fields Not Appearing
- Field Change Not Saving or Not Showing: Every Common Cause
- The HTML Field Type: Inline Content Without a Plugin
- FAQ
FunnelKit checkout fields customization is where most operators spend their first real hour of frustration. The field editor looks simple, but the moment you try to remove a billing field, add a gift-message textarea, or make phone optional, something always seems off: the change doesn’t show on the front end, the field reappears on refresh, or the conditional rule silently does nothing. This guide walks through every task in the field editor, in the order you’re most likely to need it, with the exact steps and the common failure modes for each.
Where the FunnelKit Field Editor Lives
Before you can change anything, you need to be in the right place. From your WordPress dashboard, go to FunnelKit → Funnels and click into the funnel you want to edit. If you’re using a Store Checkout (FunnelKit’s global checkout that replaces the default WooCommerce checkout site-wide), navigate to FunnelKit → Store Checkout instead. Either way, click into the checkout, then click the Checkout step. Inside that step, open the Design tab and scroll down to the Checkout Form Fields section.
That panel is your field editor. Everything, billing fields, shipping fields, and any custom fields you add, lives here. If you haven’t set up a FunnelKit checkout yet, see the complete beginner’s guide to setting up FunnelKit checkout from scratch before continuing.
One thing worth noting: the field editor works at the individual checkout step level. If your funnel has a multi-step form, each step has its own field layout. A field you add to Step 1 won’t automatically appear in Step 2.
Editing Existing Billing and Shipping Fields
The billing and shipping sections are pre-built. You can edit the label, placeholder, and required status of any field in them, and you can remove or reorder them without touching any PHP.
Edit a field label or placeholder
- Hover over the field row. A pencil (edit) icon appears.
- Click the pencil icon to open the field settings panel.
- Change the label, placeholder, or any other property.
- Click Save inside the panel, then click Update on the page.
Remove a field
Hover over the field row and click the trash icon. Confirm the deletion. Then click Update. Some core WooCommerce fields (like email) can’t be deleted entirely because WooCommerce requires them for order processing.
Reorder fields and sections
Drag and drop works for both individual fields and entire sections. Grab the handle on the left side of a row and drag it up or down. To move a whole section, grab the section header and drag. You can also reorder sections the same way: hold the section and drag it to where you want it.
To edit a section heading or sub-heading, click the pencil icon on the section header. To remove a section entirely, use the trash icon there.
Making Fields Required or Optional
Required and optional status lives on each individual field. To change it, navigate to the Design tab and scroll to the Checkout Form Fields section. Find the field you want to change and toggle the Required switch on or off. Click Update when done.
That toggle controls whether the form blocks submission and shows a validation error when the field is empty. FunnelKit also has an inline validation feature: when it’s enabled under Optimizations → Field Inline Validation, customers see real-time error prompts as soon as they click out of a required field they left blank, rather than finding out only when they hit the Place Order button.
One practical note: making a checkbox required almost always kills conversion. The only legitimate use case is legal compliance, like a minimum-age confirmation. For everything else, keep checkboxes optional and let the data collection be passive.
Adding Custom Fields to Your FunnelKit Checkout Fields Setup
Custom fields let you capture any data your fulfillment, compliance, or personalization workflow needs. FunnelKit supports a wide range of field types so you’re not forced into a plain text input for everything.
Available field types
When you open the Add New Field modal, you can choose from text, password, textarea (paragraph), select (dropdown), radio, checkbox, multi-select, number, telephone, hidden, email, date picker, HTML, and file upload, among others. There are 12 or more input types available depending on your plan.
Step-by-step: add a custom field
- In the Design tab, scroll to Checkout Form Fields and click Add New Field. A modal window opens.
- Choose a Field Type (for example, radio, checkbox, or textarea).
- Enter a Field Label, which is what customers see on the form.
- Set a Field ID (Order Meta Key). This is the key under which the value is stored in the order. Use underscores for multi-word IDs, for example
gift_messageordate_of_birth. Pick something unique: if this key collides with an existing WooCommerce or plugin meta key, data can overwrite or fail silently. - Optionally set a default value and placeholder text.
- Toggle Show on Thank You Page and/or Show in Order Email if you want the captured value to appear in the confirmation and notification emails automatically.
- Click Add to create the field. It appears in the Available Fields pool.
- Drag the new field from the pool into the section of the form where you want it to appear. If you skip this step, the field is created but never shown to customers.
- Click Save to lock in the layout.
The field value is stored as order meta and can be viewed on the single order page in WooCommerce admin. If you also use FunnelKit Automations, you can pull that field value into email sequences using the Order Data merge tag with the exact Field ID you assigned. See the article on FunnelKit merge tags not working if the value isn’t appearing in your automation emails.
Setting Up Conditional Fields
Conditional logic lets you show or hide a field based on what the customer has already entered or selected. Think of it like a branching conversation: you only ask for the gift message when someone has checked the gift-wrap option. Showing every possible field to every customer is friction you don’t need.
How the conditions work
FunnelKit’s built-in conditional field rules support two logical operators. Within a single group, conditions are joined with AND: all of them must be true for the field to appear. Add a second group and the groups are joined with OR: the field appears if either group’s conditions are satisfied.
Available condition variables include cart category, cart product, cart total, user role, country, and more, so you can target specific customer segments precisely.
Step-by-step: add a condition to a field
- In the Design tab under Checkout Form Fields, expand the section containing the target field.
- Click Add Condition on that field.
- Select Apply to specific fields, then choose the field you want to make conditional.
- Set the trigger: choose a condition variable (for example, “Cart Category is Wholesale”), pick the operator, and enter the value.
- To add a second AND condition, click Add within the same group.
- To add an OR group, click Create Filter Group.
- Click Add to confirm, then Save to store the rule.
Checkbox, radio, and Select2 triggers
The built-in condition panel covers most cart-level and user-level logic. For field-to-field conditional logic, where the answer in one field triggers the appearance of another, FunnelKit provides that through a custom code snippet approach using its developer hooks. The official docs include copy-paste templates for checkbox triggers, radio triggers, and Select2 (searchable dropdown) triggers.
A straight caveat: these snippets are PHP class definitions that hook into FunnelKit’s internals. You add them to a code snippet plugin or your child theme’s functions.php file, and you need to edit field IDs and option values directly in the code. If you’re not comfortable reading and modifying PHP, get a developer to set this up once. A typo in a field ID will silently break the conditional behavior with no error message. Each snippet maps a parent field ID to the child field IDs that should appear when a given value is selected.
Before reaching for the code route, verify you can’t solve the problem with the built-in condition builder. The built-in approach is easier to maintain and doesn’t break on plugin updates the way inline PHP snippets sometimes do.
Where Custom Field Data Goes and How to Use It
Every custom field value is saved as order meta under the Field ID you set. You can see it on the order detail page in WooCommerce admin. That meta key is your handle for pulling the data into other systems.
- Thank you page: when you enable Show on Thank You Page on the field, the captured value appears in the order summary the customer sees immediately after purchase.
- Order email: toggling Show in Order Email includes the value in the standard WooCommerce order confirmation and admin notification emails.
- FunnelKit Automations: to pull a custom field value into an automation email, you need FunnelKit Automations active and an automation built with an Order Created trigger and a Send Email action. Inside the email editor, click Merge Tags, then click Configure next to Order Data, and paste the field’s meta key. That tag will output the stored value in the email body. To sync the data as a contact-level custom field in FunnelKit Automations, create matching fields in both places and add an Update Fields action to the same automation that maps the checkout meta key to the CRM field.
- Invoice plugins: if you use a third-party invoice generator, map the Field ID to the corresponding invoice template placeholder. The docs note this is the mechanism for printing custom field values on invoices.
One thing to verify yourself: if you’re passing data to a non-FunnelKit CRM via webhook or a plugin integration, confirm the integration reads WooCommerce order meta directly. Not every connector does this automatically.
Worked Example: Adding a Conditional Gift-Message Field
Here’s a concrete walkthrough. You sell physical products and want to offer gift wrapping. When a customer selects “Yes” to gift wrap, a textarea for a personalized message should appear. Neither field should block the purchase.
- Create the trigger field. In the Design tab, click Add New Field. Set Field Type to Radio. Label: “Gift wrap this order?”. Field ID:
gift_wrap. Options (pipe-separated):Yes|No. Default:No. Leave Required off. Click Add. - Create the dependent field. Click Add New Field again. Set Field Type to Textarea (Paragraph). Label: “Gift message”. Field ID:
gift_message. Placeholder: “Write your message here”. Toggle Show on Thank You Page on. Toggle Show in Order Email on. Leave Required off. Click Add. - Place the fields. Drag
gift_wrapinto your chosen form section. Draggift_messagedirectly below it. - Add the condition. Click Add Condition on the
gift_messagefield. Select “Apply to specific fields,” choosegift_message, then set the rule: the trigger fieldgift_wrapequalsYes. Click Add. - Save. Click Save. Open your checkout in a new browser tab. Confirm the message field is hidden by default and appears when “Yes” is selected.
- Verify the data. Place a test order. In WooCommerce admin, open the order. Confirm
gift_messageappears in the order meta with the value you typed.
If the gift message also needs to feed an automation, for example a flag to your fulfillment team, see the article on FunnelKit automations not triggering if that automation isn’t firing after setup.
Third-Party Plugin Fields Not Appearing
Some plugins, for example EU VAT number validators or country-specific field plugins, hook their fields into the standard WooCommerce checkout using PHP filters. FunnelKit renders its own checkout template, so those hooks don’t always fire in the right place.
FunnelKit’s answer to this is the Extra Advanced Fields feature. It’s a special field type you drag into your form layout. Once placed and saved, it acts as a rendering slot that tells FunnelKit to output whatever the third-party plugin registered in the billing or shipping address area. Check your plan’s feature list to confirm this option is available to you before spending time on it.
To use it: in the Design tab under Checkout Form Fields, look for the Extra Advanced Fields option in the Available Fields pool. Drag it into the relevant address section. Save. Check the front end to confirm the plugin’s field now renders.
If the field still doesn’t appear, the conflict is likely deeper: the plugin may be incompatible with FunnelKit’s template entirely. The official docs recommend deactivating any other standalone checkout field editor plugin to avoid conflicts. Running two field editors at once is a guaranteed source of stale data and fields that disappear unexpectedly.
Field Change Not Saving or Not Showing: Every Common Cause
You made a change. You hit Save. You refresh the front end and nothing changed. Or the field is back the way it was. Here’s the systematic list of what actually causes this.
1. You closed the modal without clicking Save
The Add New Field and Edit Field modals each have their own Save or Add button inside them. Closing the modal with the X button discards your changes. The page-level Update button only saves the layout; it doesn’t save unsaved modal edits. Confirm you clicked the button inside the modal first, then clicked Update on the page.
2. The field was created but never dragged into a section
After you create a custom field it lives in the Available Fields pool. It won’t appear on the checkout form until you drag it into a named section. This is the single most common reason a custom field is invisible on the front end.
3. A conflicting checkout field editor plugin is active
If you have another WooCommerce checkout field editor plugin installed and active, it may override FunnelKit’s field definitions on every page load. FunnelKit’s own documentation flags this specifically: deactivate or uninstall any other checkout field editor to avoid the conflict. The symptom is usually that edits appear to save but revert on refresh.
4. Page cache is serving a stale version
FunnelKit checkout pages should be excluded from full-page cache, but if your caching plugin or hosting cache wasn’t configured correctly, you’ll see the old version until the cache clears. Purge your cache (plugin-level and server-level if you’re on managed hosting) and test again in a private/incognito window.
5. A conditional rule is hiding the field correctly
If a field you added isn’t visible, check whether you also set a condition on it. Open the field’s condition settings and confirm the condition evaluates to true in your test scenario. A condition that’s more restrictive than you intended will silently hide the field for all customers who don’t match it.
6. Theme or JavaScript conflict
Some themes output extra CSS or JavaScript that interferes with checkout field rendering. The symptom is usually fields that are misaligned, invisible, or triggering console errors. To isolate this, switch to a default WordPress theme temporarily. If the field appears correctly with the default theme, the conflict is theme-specific. You can also check the browser console for JavaScript errors, which the FunnelKit troubleshooting docs flag as a common source of interactive functionality failures.
7. You’re editing the wrong checkout
FunnelKit lets you run multiple funnels and a global Store Checkout simultaneously. Edits to one don’t affect the others. Confirm the URL the customer lands on matches the checkout you’re editing. If you’re troubleshooting a checkout that isn’t loading correctly in the first place, the article on FunnelKit checkout not loading covers that separately.
The HTML Field Type: Inline Content Without a Plugin
One underused option is the HTML field type. It doesn’t collect data; it renders arbitrary HTML inline in the form. You can use it for a short notice (“Delivery to PO boxes takes 2 extra business days”), a trust badge, or a section separator with a custom heading.
Create it the same way as any other custom field: click Add New Field, choose HTML as the type, write your markup in the content area, and drag it into position in the form. You can also choose to show it on the thank you page and in order emails, which is occasionally useful for conditional confirmation messaging.
The HTML field doesn’t have a Field ID that maps to order meta, so it won’t appear in the order record. Keep that in mind if you’re trying to track whether a customer saw a specific notice.
FAQ
How do I add a custom field to FunnelKit checkout?
In the Design tab of your checkout step, scroll to Checkout Form Fields and click Add New Field. Choose your field type, fill in the Field Label and a unique Field ID (Order Meta Key), set any options, then click Add. After the modal closes, drag the field from the Available Fields pool into a form section and click Save. The field won’t appear on the front end until you complete that drag-and-drop step.
How do I make a FunnelKit checkout field required or optional?
Navigate to the Design tab, scroll to Checkout Form Fields, find the field, and toggle the Required switch on or off. Click Update to save the change. That toggle controls whether the form blocks submission when the field is empty.
Why is my FunnelKit checkout field not showing on the front end?
The most common reason is that the field was created but never dragged into a form section: it’s sitting in the Available Fields pool, not in the active layout. Other causes include a competing checkout field editor plugin overriding the layout, a page cache serving a stale version, or a conditional rule that’s hiding the field because the current customer doesn’t match the condition.
Can FunnelKit checkout fields use conditional logic?
Yes. On any field, click Add Condition and set rules based on cart content, cart total, user role, country, and more. Multiple conditions within one group use AND logic; separate groups use OR logic. For field-to-field triggers (where selecting a radio option reveals another field), FunnelKit provides code-snippet templates in its developer docs for checkbox, radio, and Select2 trigger types. Those snippets require editing PHP directly, so have a developer set them up if you’re not comfortable with that.
Where is custom field data stored and how do I access it?
Each custom field value is stored as WooCommerce order meta under the Field ID you set. You can view it on the single order page in admin. Toggle Show on Thank You Page or Show in Order Email in the field settings to surface it in the confirmation flow automatically. In FunnelKit Automations, use the Order Data merge tag with the field’s meta key to pull the value into email sequences: inside the email editor of an Order Created automation, click Merge Tags, then Configure next to Order Data, and paste the meta key.
A third-party plugin’s checkout field isn’t showing in my FunnelKit checkout. What do I do?
FunnelKit renders its own template, so PHP hooks from other plugins don’t always fire in the right place. Use the Extra Advanced Fields type: drag it into the relevant address section in your form layout and save. This tells FunnelKit to render the third-party plugin’s fields at that position. Check your plan’s feature list to confirm Extra Advanced Fields is available on your tier before diving in. If the conflict is deeper, the plugin may be fundamentally incompatible and you’d need to replicate the field natively in FunnelKit’s own field editor.
Sources:
Sources: FunnelKit Docs: Fields (Checkout Pages); FunnelKit Docs: Add New Custom Fields in the Checkout Form; FunnelKit Docs: Set Fields Required or Optional; FunnelKit Docs: Set Up Conditional Fields in Checkout Form; FunnelKit Docs: Extra Advanced Fields; FunnelKit Docs: Create Steps and Sections; FunnelKit Docs: Troubleshooting Tips; FunnelKit Docs: Conditional Field Using a Checkbox; FunnelKit Docs: Conditional Field Using a Radio Field; FunnelKit Docs: Conditional Field Using a Select2 Field; FunnelKit Docs: Save Checkout Data to Custom Fields in FunnelKit Automations; FunnelKit Docs: Access Custom Order Fields in Automations; FunnelKit Docs: Creating a Store Checkout (Global Checkout Funnel). All documentation verified July 2026.
Brian Kasday spent forty years in direct-response marketing before rebuilding the whole operation as a one-person shop. He writes The Operator’s Library — including “The Missing Manual for FunnelKit” — for operators who’d rather build it themselves than wait on someone else.
Get the Builder’s Companion Kit — the free checklists and templates that pair with this guide: mmsvegas.com/op/funnelkit-resources/.
This guide fixes one FunnelKit step. The Missing Manual for FunnelKit covers the whole checkout system. See the manual →
More FunnelKit guides
Free · FunnelKit Operator Toolkit
Building checkouts in FunnelKit?
Get the free operator toolkit — order-bump templates, checkout checklists, and a note when what you just read changes.
Get the free toolkit →